
SapphireOne Accounts Receivables Report Tutorial: The Balances Report
December 18, 2020 9:00 am | by John Adams

Creating an Accounts Receivables Balances Report in SapphireOne.
SapphireOne has a variety of Accounts Receivables reports available, each allowing you to report dynamically on client data for many different purposes. The aim of the Account Receivables Report tutorials is to take you through each of the six reports so you can stay informed and up-to-date on SapphireOne reporting functionalities.
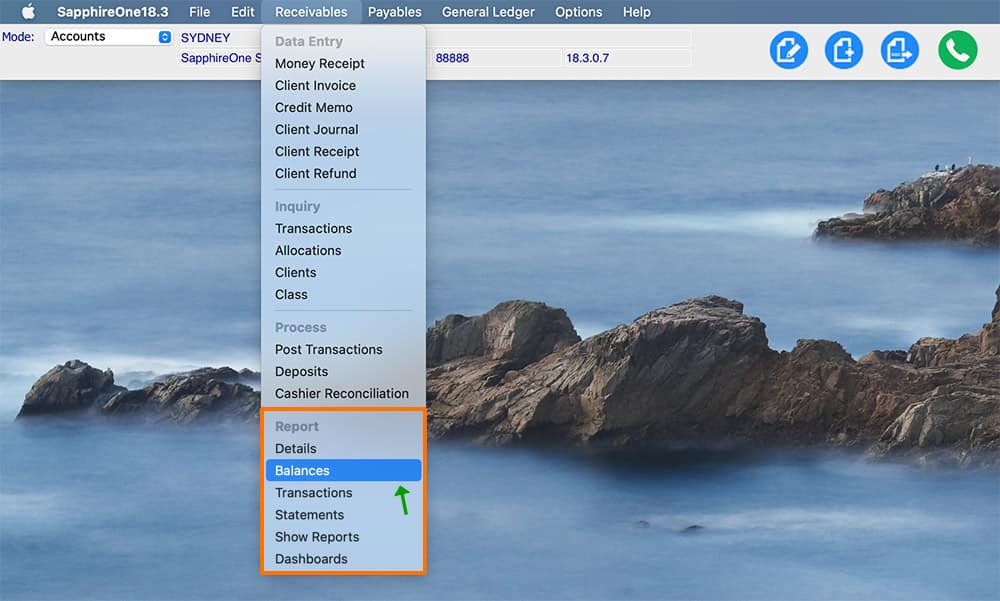
SapphireOne has six different types of Accounts Receivables reporting options, these include:
- Details
- Balances
- Transactions
- Statements
- Show Reports
- Dashboards
In our previous post we looked at when and how to create the Client Details Report. In this post we will be looking in more detail at the second Accounts Receivables reporting option, the Balances Report.
The Balances Report.
The Client Balances Report gives you the ability to create and print a Credit Information report on Clients who currently have outstanding balances, giving you an overview of exactly which Clients owe money.
When selecting the Balances Report, you are presented with a print dialog pop-up enabling the selection of items required in the report:
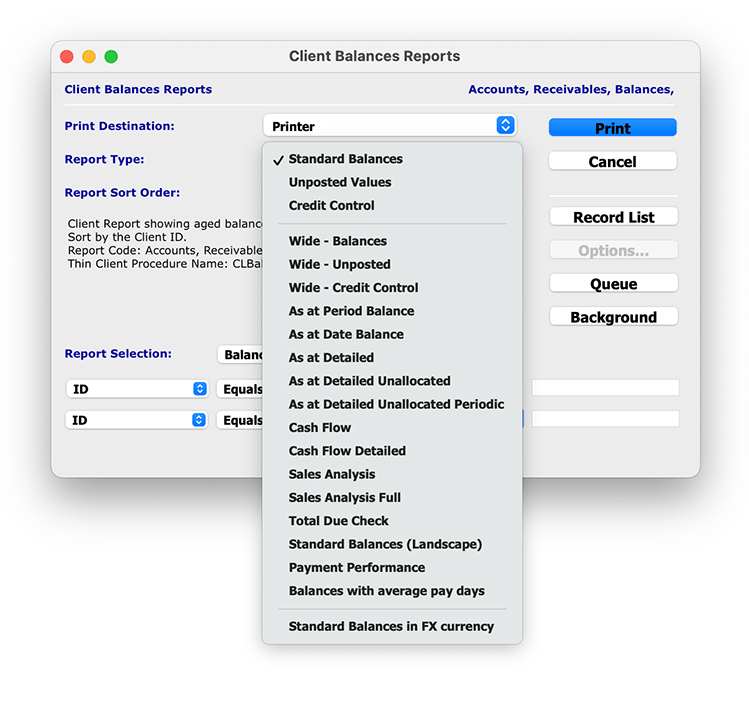
This reporting function gives you the ability to choose from 20 different report types to best suit your specific reporting requirements. Below is an overview of each Report Type, and what each type can be used for:
- Standard Balances – This report shows the Standard Aged Balances.
- Un-posted Values – This report includes the un-posted values in the Standard Aged Balances Report.
- Credit Control – This report adds information about last receipt date and amount, contact, position and phone details.
- Wide – Balances – This report allows for the print of the reports in a wide format increasing the amount of Balance Data displayed.
- Wide – Un-posted – Allows the printing of the reports in wide format increasing the amount of Balance Data displayed, including un-posted.
- Wide – Credit Control – Allows the printing of the reports in wide format increasing the amount of Balance Data displayed, including Last Receipt details.
- As at Period Balance – This report gives the Client Balances as at a particular period in time. This should agree with the Balance Sheet Control Account for the same period.
- As at Date Balance – This report gives a balance report based upon current transactions.
- As at Detailed – This report gives a balance report based upon 7, 14, 21, 30, 60 and 90 days. This report also provides the Client’s agreed terms.
- As at Detailed Unallocated – This report prints balances for each client that are overdue and are also unallocated as of the entered date.
- As at Detailed Unallocated Periodically – This report prints balances for each client that are overdue and are also unallocated for a chosen period.
- Cash Flow – This report allows you to specify a given date prior to viewing balances to aid in cash flow projections.
- Cash Flow Detailed – This report allows you to specify a given date prior to viewing balances and transactions to aid in cash flow projections.
- Sales Analysis – This report gives a brief Sales Analysis of each Client.
- Sales Analysis Full – Gives full details of the Sales Analysis.
- Total Due Check – Simple Report that only prints: Total Due, Historial Total and Current Total.
- Standard Balances (Landscape) – This is the same as the Standard balances report, but in landscape format with extra room for Company name.
- Payment Performance – This prints a report in the form of a chart for the selected Clients displaying their payment performance as a percentage for payment term periods.
- Balances with Average Pay Days – This report prints out for the selected, Clients the average time in days it takes a Client to make payment.
- Standard Balances in FX Currency – Prints the balances in both the Local and FX currencies.
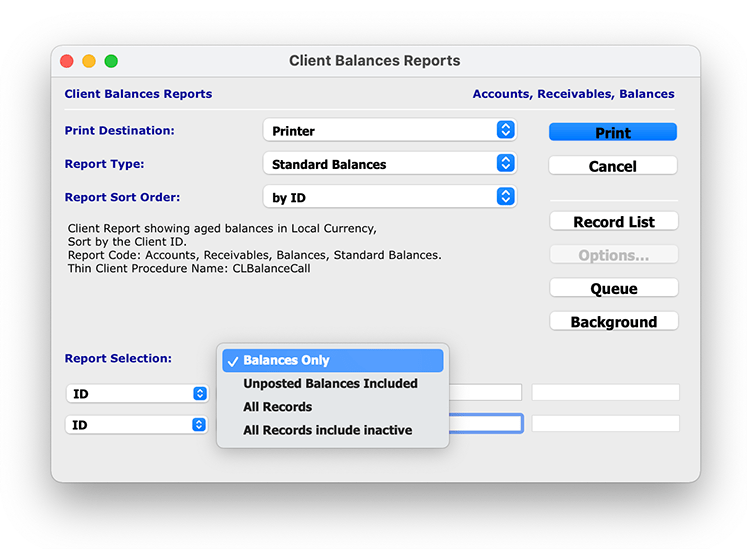
The ‘Report Selection’ drop-down menu also allows you to select which Clients balance data you would like to report on, allowing you to get more granular and specific with your reporting capabilities:
- Balances Only – This will print out all of the active Client balances. It will be limited to those Clients who do not have a zero balance.
- Unposted Balances Included – Will print out a report which includes all active Clients balances which will now include any unposted transactions and again those Clients who do not have a zero balance.
- All Records – This option will tell the system to print balances for all active Clients currently in the system including those with a zero balance.
- All Records Include Inactive – The system will print the balances for all Clients in the system including those who are currently marked as inactive. This will not reset their inactive state to active and it will also list those who have a zero balance which should mostly be the inactive clients.
Once you have chosen your defined report details, and selected ‘Print’, you have the option to open the report as a PDF or print the report directly from SapphireOne.
Any questions?
Stay tuned for the next blog post in our next Accounts Receivables Reporting Tutorials, where we will be focusing on the Transactions Report.
For more information on Accounts Receivables Reports, or to find out how you can get the most out of your SapphireOne application, please contact us or book a call with a member of our Support Team. We love hearing from you!