
Entering JobKeeper Payments in SapphireOne
May 11, 2020 8:30 am | by John Adams

JobKeeper is a wage subsidy scheme recently introduced by the Federal Government to support businesses in navigating the severe economic impacts caused by COVID-19. It is aimed at maintaining jobs for Australian employees, as well as at helping companies to restart their business quickly once the crisis has passed. We know that there is a lot to take in when it comes to JobKeeper. For this reason, SapphireOne is providing you with continuous support to simplify the process of implementing this new program by adjusting your Payroll/HR.
New information and updates regarding JobKeeper are being released on a constant basis. Therefore, we advise all our clients to read the below instructions, even if they have already successfully set up JobKeeper payments according to our previous blog SapphireOne is now JobKeeper Ready. This will enable you to ensure that your settings are adjusted correctly to comply with the ATO’s reporting guidelines.
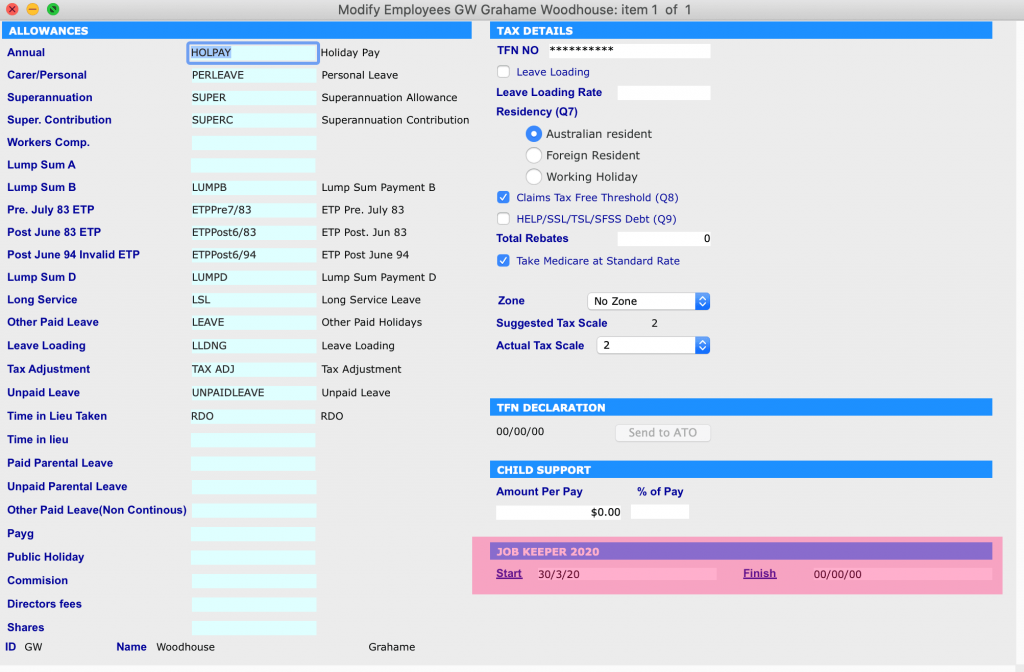
JobKeeper Start and Finish Date
Employers are obliged to indicate any wage payments made to their eligible employees under the JobKeeper scheme via STP. Further, they need to notify the ATO of the start date of the first JobKeeper fortnight they are claiming reimbursement for. The failure to do so will result in forfeiture of the claim.
Correspondingly, employers are also held to update the ATO about any ceasing of JobKeeper payments that were previously made to eligible employees. As a result, we recommend to our clients not to enter a Finish date. (Please be aware that this recommendation may change in the future in the case that the Government releases any new information. We will keep you updated of any changes via our blog.)
If either the employee or employer becomes ineligible while the JobKeeper scheme is still in place, a Finish date will have to be added before the end of the last pay run. Reasons for ineligibility include, for example:
- Receiving workers compensation payments
- Receiving Parental Leave Pay
- Receiving Dad and Partner Pay
- Cessation of employment
- Changes in the status of citizenship or visa
Update JobKeeper Payments in SapphireOne to comply with ATO guidelines
In case you have already set JobKeeper in SapphireOne, please follow the instructions below to adjust your settings to comply with the up-to-date reporting guidelines of the ATO.
1. Do not enter a JobKeeper 2020: Finish date.
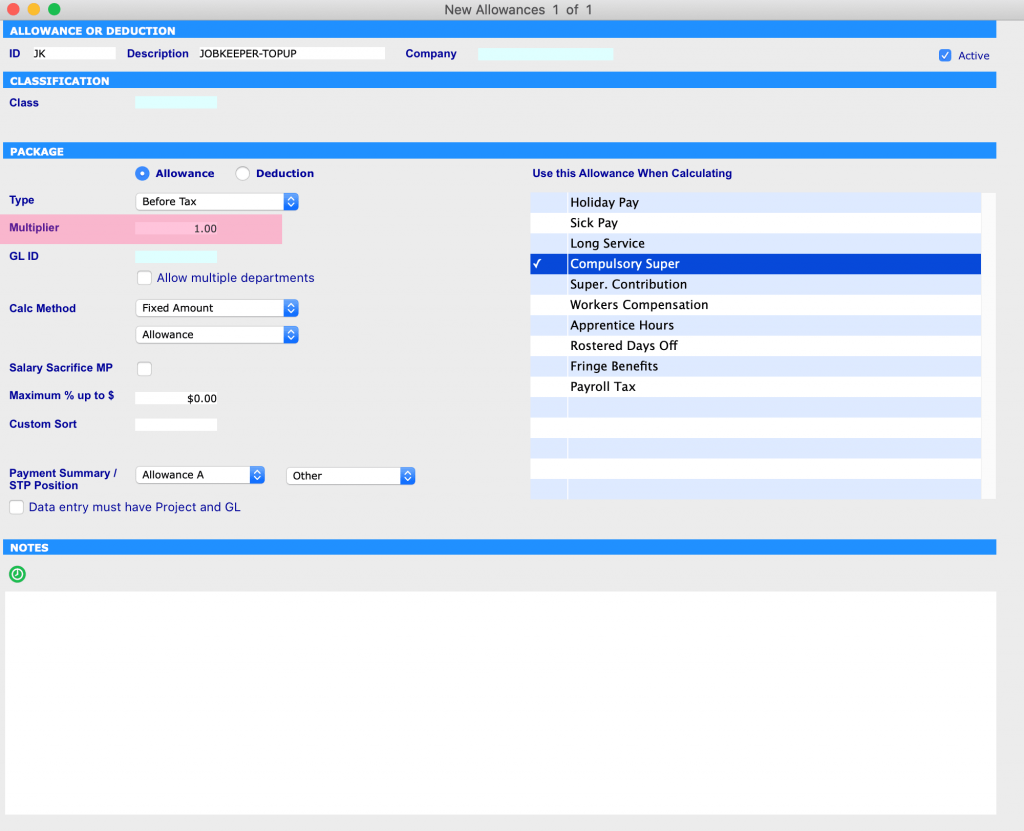
2. In the JobKeeper Allowance setting, set the Multiplier as ‘1.00’.
Additionally, you will need to adjust this value in Working Transactions for every employee who is eligible for JobKeeper payments.
Four Example Scenarios of Processing JobKeeper Payments
The below is an instruction on how to use SapphireOne’s JobKeeper Payment functionality in your pay run.
As the ATO has prescribed specific naming conventions for identifying various payments under the scheme, we advise our clients to use these in order to receive reimbursements without any unnecessary complications or delay. If you do not use the correct naming protocols, the STP will fail.
We have created 4 different scenarios to help guide you through the correct processing of JobKeeper payments.
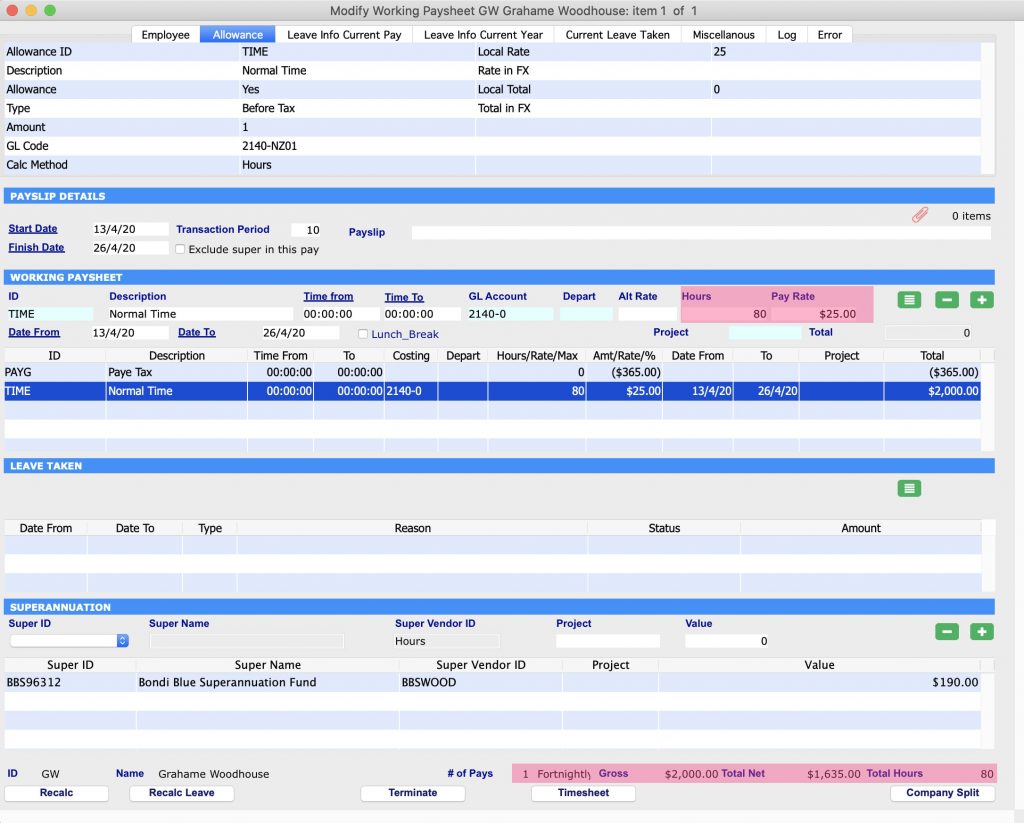
Scenario 1: Employee Alex receives $2000 per fortnight
Alex gets paid gross $2000 per fortnight. This value exceeds the JOBKEEPER-TOPUP amount. As a result, you do not need to add any entry of JobKeeper Allowance in Working Transactions. As long as you have set a JobKeeper Start date, SapphireOne’s system will automatically notify the ATO regarding JobKeeper payment via STP.
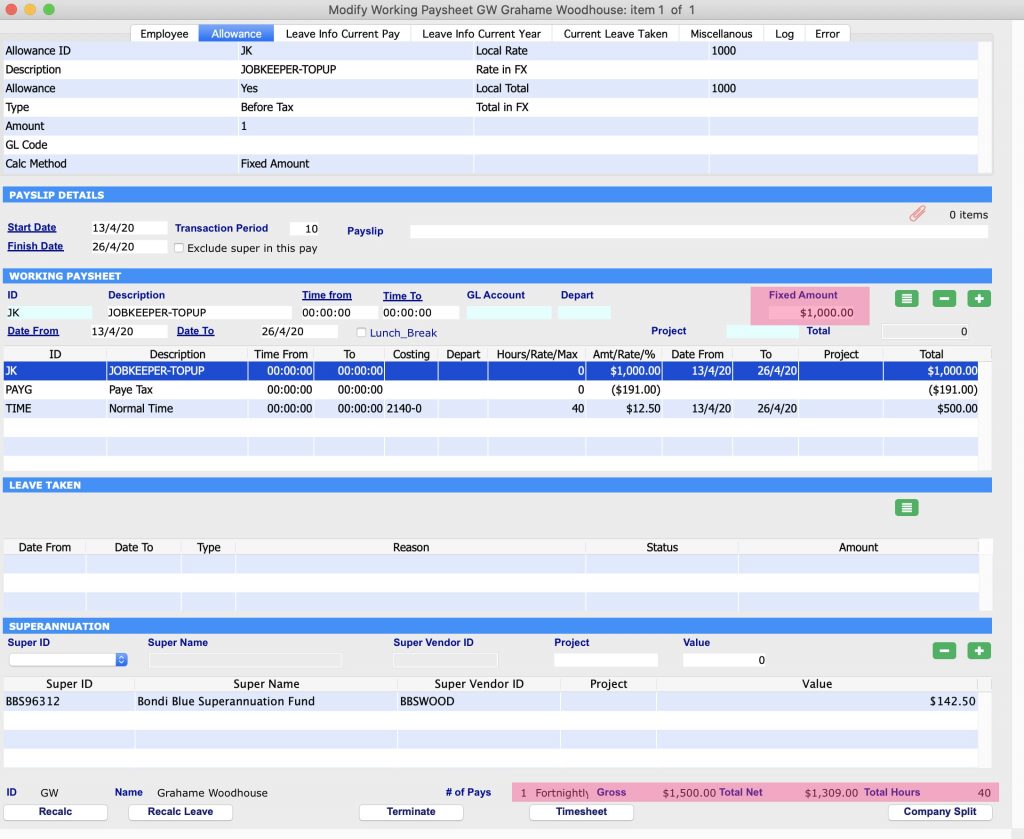
Scenario 2: Employee Bruce Gets receives $500 per fortnight
Bruce gets paid gross $500 per fortnight. This value is less than the JOBKEEPER-TOPUP amount. As a result, you will need to set JOBKEEPER-TOPUP Allowance to ‘$1000’. This will ensure that Bruce receives the correct amount of gross $1500 per fortnight under the JobKeeper scheme.
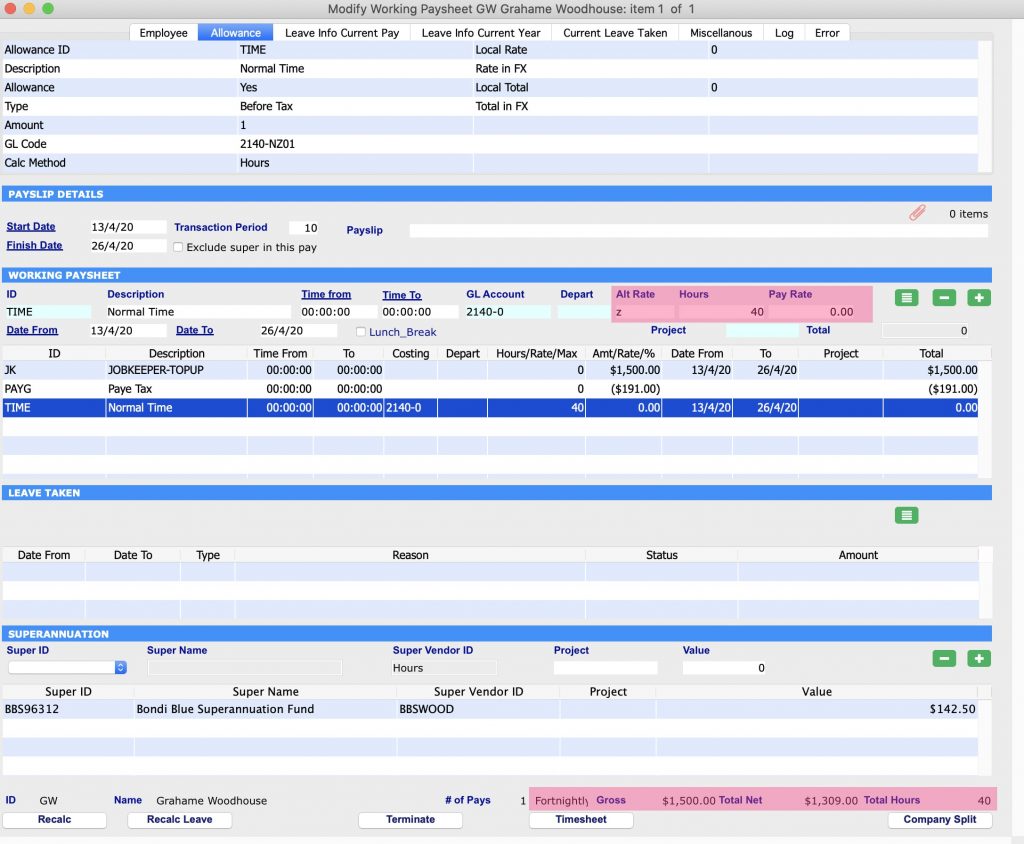
Scenario 3: Employee Chris is stood down and his normal working hours are 40 hours per fornight
Chris has been stood down, therefore his normal hours need to be entered at a Pay Rate of ‘0.00’. As a result, the system will accumulate leave for the 40 hours fortnightly he usually works. The value for JOBKEEPER-TOPUP Allowance needs to be set at $1500. This ensures Chris receives the JobKeeper payment.
If you encounter issues setting the Pay Rate at ‘0.00’, then enter ‘z’ as the Alt Rate before entering the Pay Rate.
Scenario 4: Employee David works in Payroll and previously made a JobKeeper payment not according to the guidelines
David already paid an employee a wage of gross $500 per fortnight. Instead of using ‘JobKeeper’ in accordance with the ATO’s prescribed naming conventions, he used ‘Bonus/Other’ in Working Transactions. To rectify this error and to be able to claim reimbursement, David has to create Working Transactions in the next pay run. There are two different methods available to him:
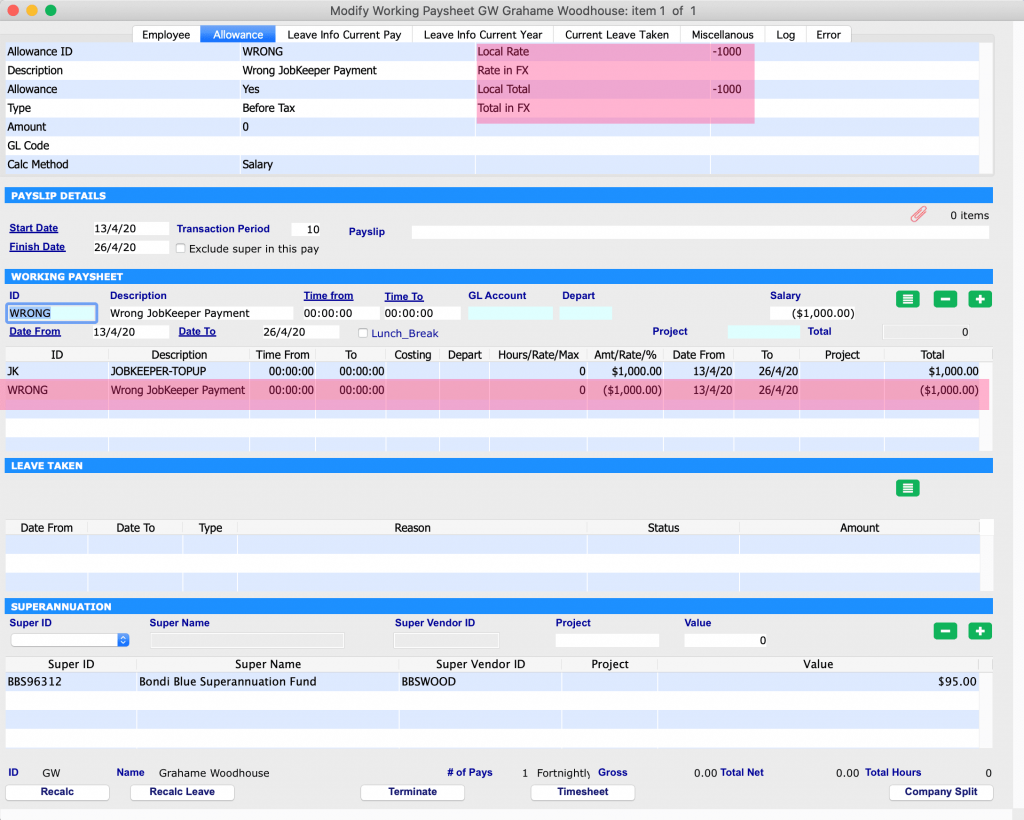
Scenario 4 – Method 1: David has to run two separate pay runs. The first one will adjust the prior wrong JobKeeper payment; the second one will pay the correct value.
Firstly, David needs to create a Working Transaction of two different types of Allowances for the employee. The JobKeeper payment needs to be entered as ‘+1000’ and the wrong Allowance as ‘-1000’.
Secondly, David has to follow the instructions of Scenario 2 above but only for the upcoming pay run.
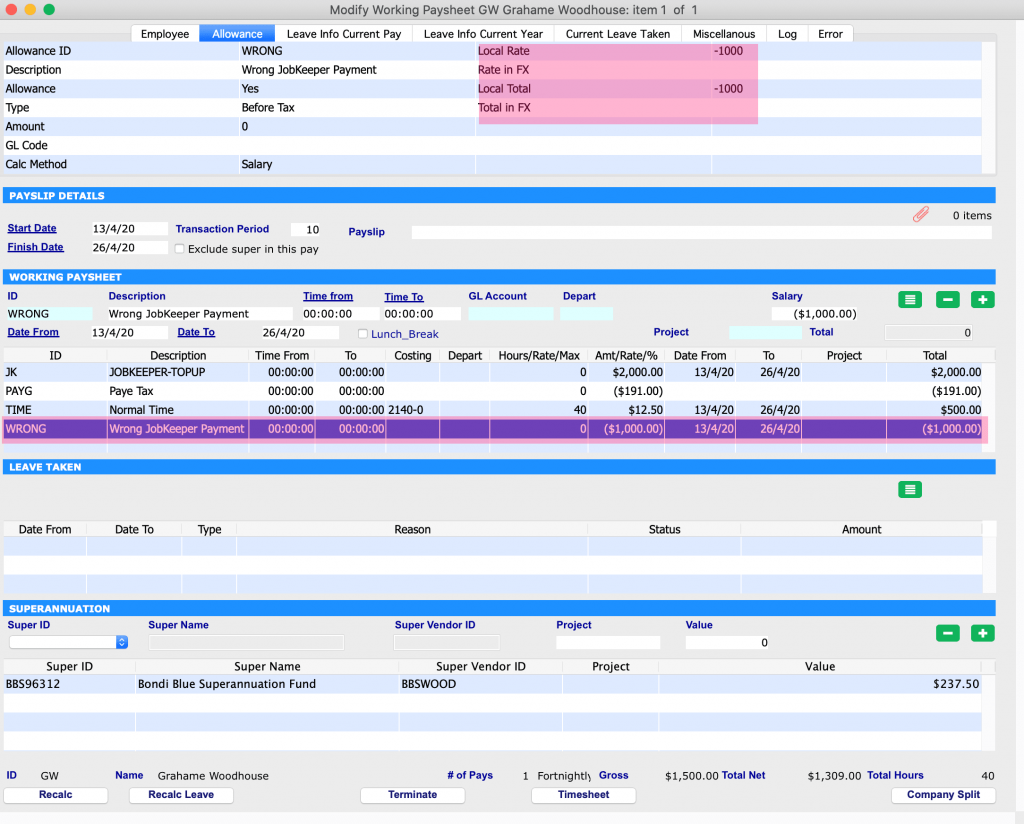
Scenario 4 – Method II: David has to adjust the Working Transaction for the employee by adding the JobKeeper allowance in addition to the wrong allowance.
Firstly, David needs to create a Working Transaction of three different types of Allowances: The Normal Salary has to be entered as ‘+$500’, the Wrong Allowance as ‘-$1000’ and the JobKeeper Payment as ‘+$2000’.
This ensures that the employee is receiving a JobKeeper Payment of $1500 and it also corrects the wrong payment that was made previously.
Secondly, David has to use this new Working Transaction for the upcoming pay run.
Please book a support call via our website, in case you have any questions or need any further assistance.
1 day left to replace your AUSKey with your myGov…Better Security and more flexible
March 26, 2020 1:07 pm | by John Adams

AUSkey will be replaced by myGovID and Relationship Authorisation Manager (RAM) at 11.59pm AEDT on Friday 27 March, 2020. Together, these services give you a secure, simple and flexible way to access government online services.
myGov ID is an easy and secure way to prove who you are online. Relationship Authorisation Manager (RAM), lets you manage who can use online services on behalf of your business. These two services makes accessing government online services, easier and more secure.
Important Notice for SapphireOne Users – Replace your AUSKey
If you are using the SapphireOne ERP System then you will be be using Single Touch Payroll (STP) functions or Business Activity Statement (BAS) through Standard Business Reporting (SBR). It is very crucial that you replace your AUSkey to myGovID today. If you do not replace it before 11.59pm AEDT on Friday 27 March, 2020 then you will no longer be able to use these services.
Steps for replacing AUSKey to myGovID
Step 1 :
If you already have myGovID then you are already one step ahead. If you don’t have myGovID then do the following:
- Download myGovID app from App store or Google Play and create myGovID
- Verify your email address as directed
- Achieve a Standard identity strength by verifying 2 documents ( eg: passport, driving licence )
- Scan your ID documents or enter details manually
- Your myGovID should be ready to use
When you enter your credentials to login in myGovID using your Windows PC or Mac via your browser like Safari, Firefox or Google chrome, the system will send a 4 digit code in your myGovID mobile phone application. You will need to enter that 4 digit code or Accept it, in order to securely access myGovID.
Step 2 :
To get started with Relationship Authorisation Manager (RAM), first the principal authority needs to set up their myGovID and link to their Australian business number (ABN) in Relationship Authorisation Manager (RAM). Once linked, they can set up authorisations for employees and others to act on behalf of the business who will accept the authorisation in Relationship Authorisation Manager (RAM).
To get started visit – https://authorisationmanager.gov.au/
From here you will be able to link your business, view and manage your business authorisations, accept an authorisation request, manage machine credentials.
Step 3 :
Machine credentials allow DSPs, businesses and registered tax and BAS agents to interact with ATO online services through their SBR-enabled software. Machine credentials are installed from Relationship Authorisation Manager (RAM) ( step 2) and used in your SBR enabled software. This performs the same function as an Administrator or Standard AUSkey in your software.
Before you create a machine credential
Before creating a machine credential, you need to download and install the browser extension software compatible with your device’s operating system:
Windows – Chrome and Firefox
MAC OS – Chrome and Firefox
Below is the detailed guideline for installing Machine credential from the ATO.
Installing a machine credential guide
This guide provides step-by-step instructions on how to create a new machine credential for an entity in Relationship Authorisation Manager (RAM).
Step 1 – Using Chrome or Firefox, go to authorisationmanager.gov.au and select the myGovID login button.
Step 2 – Log in using your myGovID by entering the email address that you used to create your myGovID.
A code will appear. Open myGovID on your smart device, log in and enter the 4 digit code into the pop-up within the app. Tap Accept.
Step 3 – Click View or manage authorisations, machine credentials and cloud software notifications. You will be directed to a view of all the entities you can act on behalf.
Step 4 – Select the entity you would like to create a machine credential for.
Step 5 – The entity homepage will be displayed with a list of all the authorisations for the entity. Click the Manage Credentials tab in the toolbar.
Step 6 – The Manage credentials page is displayed. If you’ve already installed the required browser extension, go to the next step. If you have not yet installed the required browser extension, a message advising that browser extension software is required will appear.
Step 7 – Select Create machine credential.
Step 8 – Enter the following information:
- Keystore path – This will be pre-filled but can be changed if required. This is where the machine credential will be created and stored.
- Keystore password – Choose a password. It should include at least 10 characters with no space, an upper case letter, a lower case letter, a number and a punctuation character. You’ll provide this password within your software either when setting up or authenticating. You are not required to use your myGovID password for the ‘Keystore password’.
- Verify your keystore password.
- Credential name – Enter a name for the machine credential. You should create a name which will help you to easily identify the machine credential.
- Identify the Machine Credential Custodian – This will be pre-filled with your name and cannot be changed.
Tick the box to confirm you understand and accept the machine credential details. Click Download.
Step 9 – Click finish and your credentials have been installed.
Step 10 – From the Manage credentials page you can create, view, revoke and claim unassigned machine credentials for the entity.
For more details Visit – https://softwaredevelopers.ato.gov.au/usingmygovidramandmachinecredentials
How to Upload Machine Credential into SapphireOne
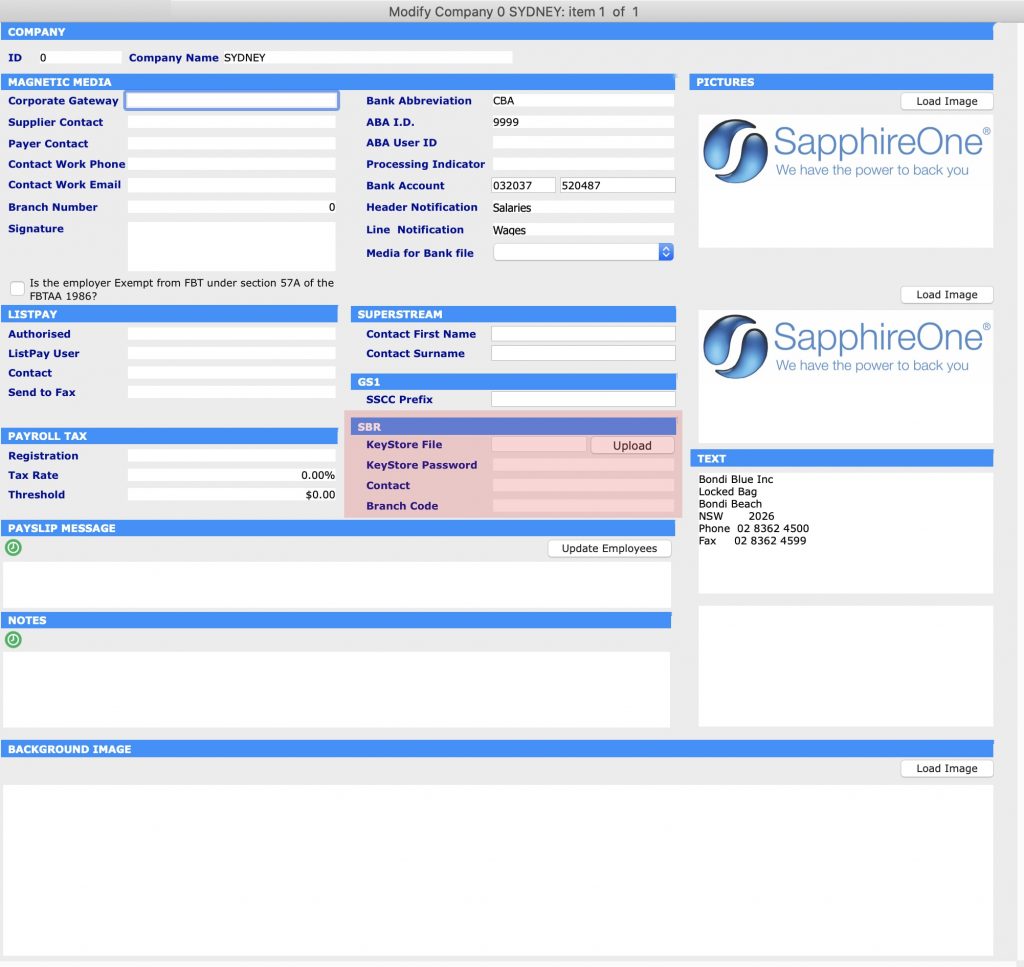
In order to upload the Machine credential into SapphireOne Go to Utilities > Controls > Company
Then click & modify the company where you want to upload Machine Credential. After that click More Details from the drop down menu.
Here in the middle of the screen you will see SBR section with an option to upload KeyStore file. Upload the Machine Credential file you have downloaded from authorisationmanager.gov.au and you will be ready to go.
ATO + SapphireOne = Relationship Authorisation Manager (RAM) to manage your company authorisations.
January 15, 2020 3:30 pm | by John Adams

Your AUSkey will retire in March 2020 and will be replaced with myGovID.
At the end of March 2020 your AUSkey will no longer be valid and will be replaced with your myGovID. Your myGovID can be managed using the ATO’s Relationship Authorisation Manager (RAM) – This will allow you to link your myGovID to your ABN and manage who can act on behalf of your business online.
You can already use myGovID and RAM for some participating government online services. This will extend to more government online services that use AUSkey or Manage ABN Connections.
Before you can submit a Single Touch Payroll event (STP) or submit a Business Activity Statement (BAS) through Standard Business Reporting (SBR), your AUSkey will need to be replaced by new machine credentials which are a component of the Machine to Machine (M2M) authentication solution.
Please click on the link below which explains how to create the machine credentials in the ATO Relationship Authorisation Manager which includes the steps you need to complete and details on installing the browser extension. There are several links to videos which will guide you through the process.
https://info.authorisationmanager.gov.au/business-software-user-or-provider
Machine credentials
The machine credential is installed on your computer and facilitates you to interact with the ATO online services through SapphireOne.
The
Machine credentials are created in the Relationship Authorisation Manager (RAM)
and replaces the AUSkey.
You will need to download and install the application plugin (Machine
credential download/browser extension) compatible with your computer’s
operating system:
Please note: Apple Safari, Windows Explorer, Microsoft Edge will not work with this plugin.
SapphireOne requirements are 17.2.1 or greater.
Please visit the Australian Taxation Office website for more details: https://info.authorisationmanager.gov.au