
SapphireOne Accounts Receivables Report Tutorial: Show Reports
January 14, 2021 9:00 am | by John Adams

How to use the SapphireOne Accounts Receivables ‘Show Reports’ function.
In the next post in our SapphireOne Accounts Receivables Report Tutorials, we will be focusing on the fifth Accounts Receivables reporting function available in SapphireOne – the ‘Show Reports’ feature.
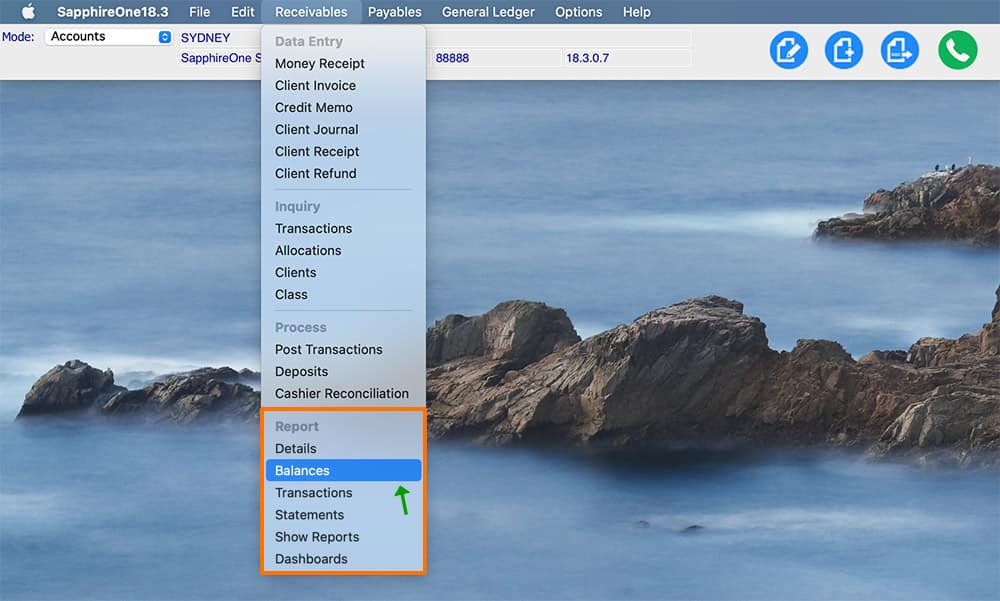
As we have seen in our previous posts, there are six different types of Accounts Receivables reports available within SapphireOne. These include:
- Details
- Balances
- Transactions
- Statements
- Show Reports
- Dashboards
In our past tutorials we have looked at when and how to create the Accounts Receivables Client Details Report, the Balances Report, the Transactions Report and the Statements Report in more detail.
Read on for the next tutorial on the Accounts Receivables ‘Show Reports’ feature, a dynamic function which offers you a wide range of customisable report display options within SapphireOne.
A closer look at SapphireOne Accounts Receivables ‘Show Reports’ functionality.
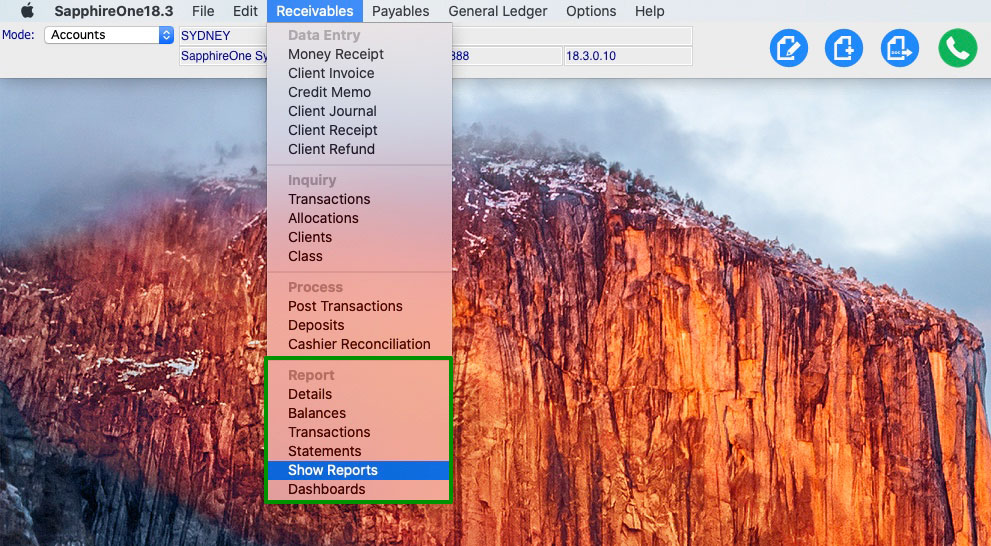
The Accounts Receivables ‘Show Reports’ functionality gives you the ability to report dynamically within the SapphireOne interface.
Rather than creating a PDF report or printing a hard copy as we have seen in the other four Accounts Receivables reporting options – Details, Balances, Transactions, Statements – the Show Reports function allows you to pick your criteria and create an interactive report in real-time on your screen.
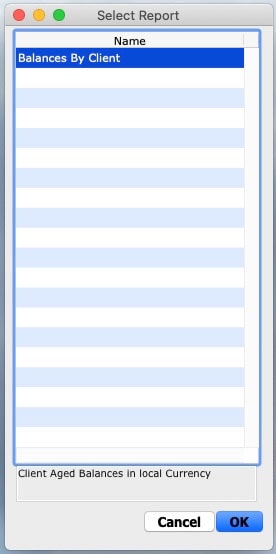
The Show Reports option presents the above pop-up, giving you the ability to create a pre-set ‘Balances by Client’ report. This report allows you to view your outstanding balances by client and report on the total amount of aged debtors in your data file.
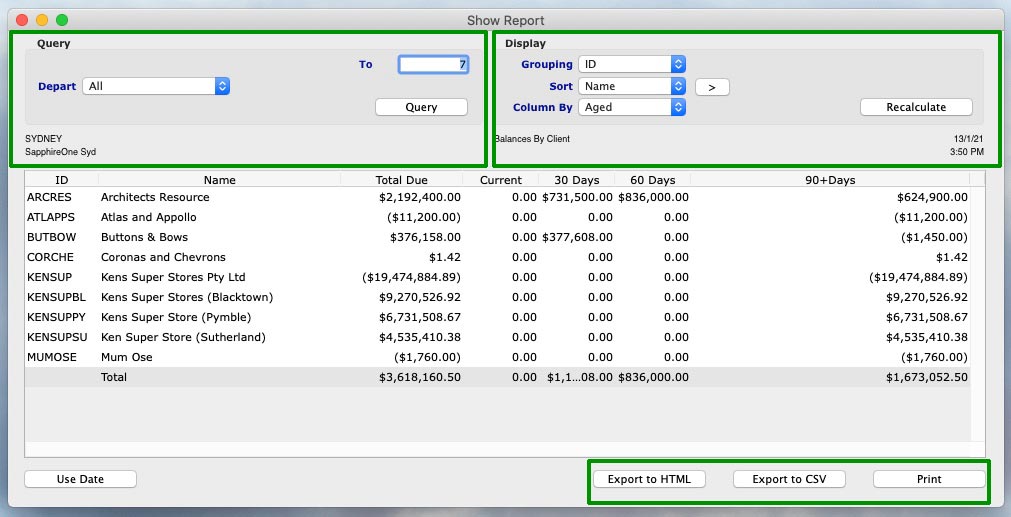
You can choose how you would like to organise your report by selecting your preferences in the dropdown ‘Query’ and ‘Display’ fields at the top of the reporting window.
Show Reports – Query Dropdown
A feature of Show Reports is that queries may be performed using convenient drop-down menus as well as a dedicated query button allowing the user to search for virtually anything that is in the data file.
The ‘Depart’ drop-down menu gives you the ability to choose from ‘All’ departments to individual ones.
Show Reports – Display Dropdown
- The Display options for the report are also selectable using drop down menus.
- By selecting ‘Grouping’, you can select how you would like your clients to be displayed in the report – by ID, Class, Department, Area, State, Customisable Tags, or by Quotes.
- There is also an option to ‘Sort’ the list ascending or descending by selecting the > button just to the right of the data entry field. The direction of the > on the button will indicate the sort order.
- The ‘Column’ can also be sorted by ‘Aged’ debtors or the individual client ‘Terms’.
- Upon entry the ‘Recalculate’ button must be selected so that the system will do an initial calculation for the default settings in the report. When any changes are made it must also be selected so the system can re-calculate the report using the new selections as made by the user.
Show Reports – Export and Print
Once the report is on screen the user may print the report, or export the data in either HTML or CSV formats for direct viewing using a browser or excel spreadsheet type program.
Any Questions?
For more information on Accounts Receivables Reports, or to find out how you can get the most out of your SapphireOne application, please contact us or book a call with a member of our Support Team. We are always here to help!
SapphireOne Accounts Receivables Report Tutorial: The Statements Report
January 4, 2021 8:35 am | by John Adams

Creating an Accounts Receivables Statements Report in SapphireOne.
For the next post in our Accounts Receivables Report Tutorials, we will be focusing on the fourth Accounts Receivables reporting option in SapphireOne, the Statements Report.
There are six different types of Accounts Receivables reporting options available within SapphireOne. This includes:
- Details
- Balances
- Transactions
- Statements
- Show Reports
- Dashboards
In our previous three posts we looked at the Client Details Report, the Balances Report and the Transactions Report. Read on to learn more about when and how to create the Statements Report, and make sure you are getting the most out of all SapphireOne reporting functionalities.
The Statements Report.
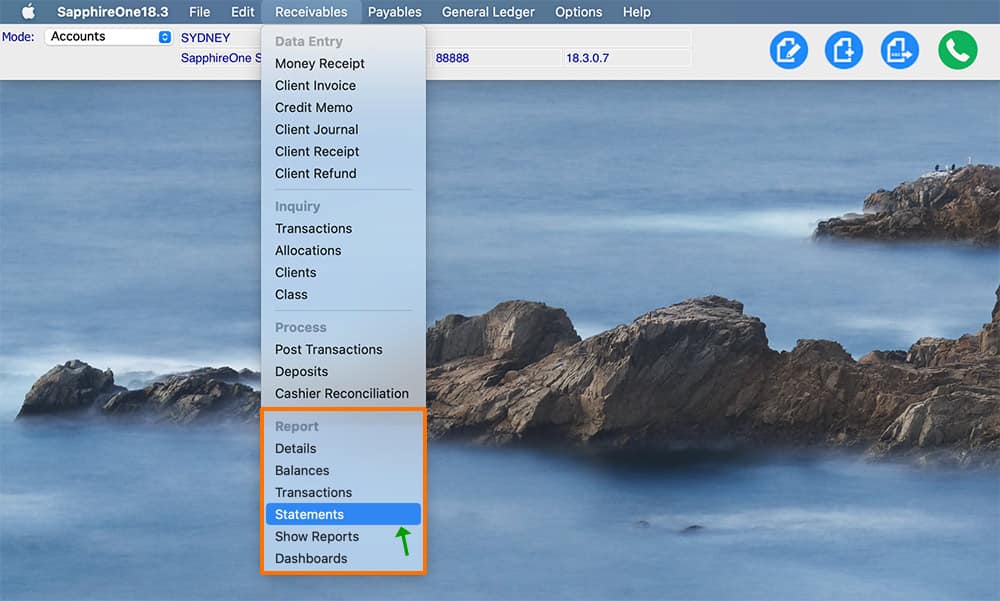
The Accounts Receivables Statements Report gives you the ability to produce different Statement layouts. This report is helpful for debt collection as it gives you the ability to produce a report to give to Clients to show they currently have outstanding.
The Statement Report presents a print dialog pop-up for the selection of the items required to be printed in the report.
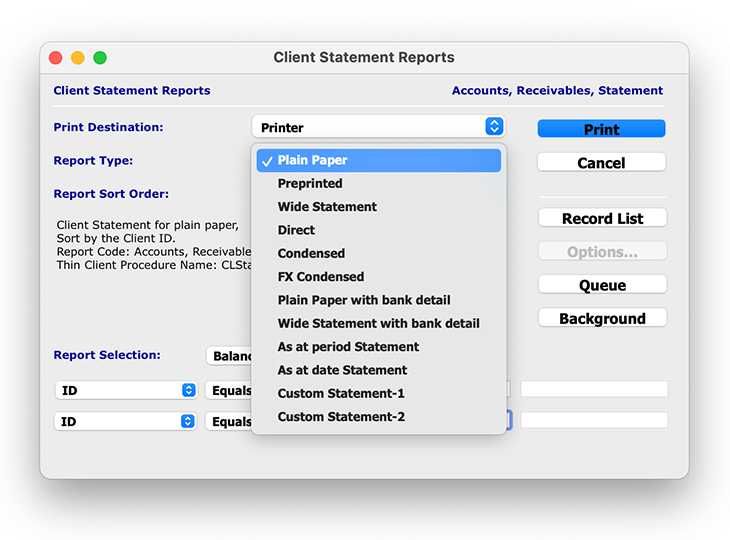
When ‘Printer’ is selected from the Print Destination drop-down menu, the ‘Report Type‘ menu gives you the ability to report on 12 different Statement Report types. This includes:
- Plain Paper – This report will print a statement onto blank paper whether using Laser or Image-Writer printers. All lines, graphics etc will be printed.
- Pre-Printed – This is for printing statements onto pre-designed forms. The lines and graphics will already be on the forms.
- Wide Statement – This report will print a landscape statement onto blank paper (Laser or Image-Writer).
- Direct – This is for printing to serial printers. The layout is set up from the Direct Print control in ‘Utilities’. Navigate to: Utilities/Controls/Direct Print Layouts
- Condensed – This report produces a compressed report for filing purposes with the same data as a statement.
- FX Condensed – This report produces a client statement report in foreign currency, and is compressed for filing purposes.
- Plain Paper with Bank Detail – This produces a statement report on plain paper with the clients bank details in portrait.
- Wide Statement with Bank Detail – This is a two section landscape report with a detailed statement on the left and a remittance on the right. The second section is a simple statement/remittance, and provides an area where the amount being paid may be entered and the entire page returned.
- As at Period Statement – This function enables the user to print statements based on an ending period. A pop up will ask for the entry of a period.
- As at Date Statement – This function enables the user to print statements based on a date as entered. A pop up will ask for the entry of a date.
- Custom Statement-1 – This is a Custom Report statement that has been set up in ‘Utilities’. Navigate to: Utilities/Controls/Custom Report Layouts.
- Custom Statement-2 – This is a Custom Report statement that has been set up in ‘Utilities’. Navigate to: Utilities/Controls/Custom Report Layouts.
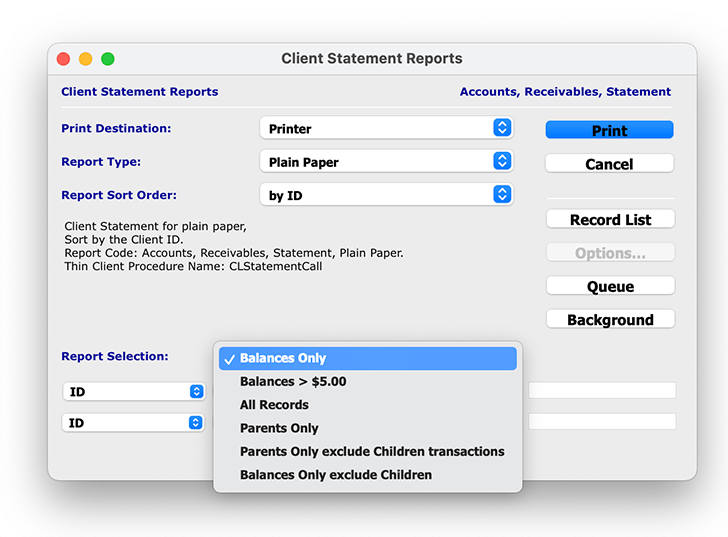
The ‘Report Selection’ drop-down menu gives you the ability to select which clients statement data you would like to report on, allowing you to get more granular and specific with your reporting capabilities.
- Balances Only – This is the default selection and the system will only print out Client balances for those who do not have a balance of $0.00.
- Balances > $5.00 – This report is the same as the default report, however it will only include Clients who have a balance owing of $5.00 or more.
- All Records – This option prints a report for all Clients irrespective of balances owing. In some instances this will be a very large report as Clients with a balance of $0.00 will be included.
- Parents Only – This option will only print those Clients who are recognised by the system as parents and have a balance owing.
- Parents Only exclude Children Transactions – This option will only print those Clients who are recognised by the system as parents and have a balance owing. Any child transactions will be excluded.
- Balances Only exclude Children – This option will print balances for all Clients, except those who the system recognises as Children of Parents.
Once you have chosen your defined report details, and selected ‘Print’, you have the option to open the report as a PDF or print the report directly from SapphireOne.
Any questions?
For the next final post in our next Accounts Receivables Reporting Tutorials we will be focusing on the remaining two ‘Show Reports’ and ‘Dashboards’ reporting functionalities within SapphireOne.
For more information on Accounts Receivables Reports, or to find out how you can get the most out of your SapphireOne application, please contact us or book a call with a member of our Support Team. We are always here to help!
SapphireOne Accounts Receivables Report Tutorial: The Transactions Report
December 21, 2020 9:51 am | by John Adams

Creating an Accounts Receivables Transactions Report in SapphireOne.
SapphireOne has six different Accounts Receivables reports options, each allowing you to report dynamically on client data for many different purposes.
- Details
- Balances
- Transactions
- Statements
- Show Reports
- Dashboards
In our previous tutorials we looked at how to create the first two Client Details Report and Balances Report in more detail. This post focuses on the third Accounts Receivables report option within SapphireOne, the Transactions Report.
Continue reading to learn more about when and how to use the Accounts Receivables Transactions Report, and stay up-do-date on all reporting functionalities available with SapphireOne.
The Transactions Report.

The Client Transactions Report gives you the ability to generate a list of all outstanding transactions via a variety of different criteria and fields contained within your SapphireOne Client data profiles.
When selecting the Transactions Report, you are presented with the following print dialog pop-up enabling the selection of items required in the report:
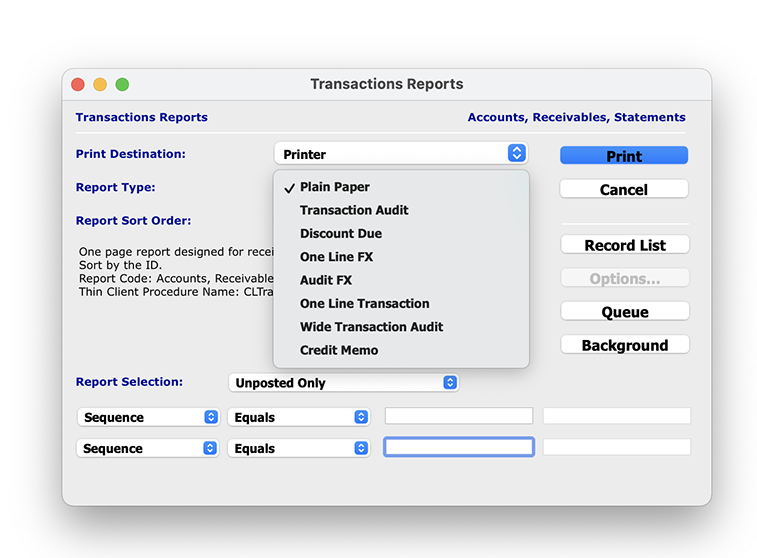
When ‘Printer’ is selected from the Print Destination drop-down menu, the ‘Report Type’ menu gives you the ability to create 8 different Transaction Report Types depending on your specific reporting requirements. This includes:
- Plain Paper – This report is a one page report designed for receipts only.
- Transaction Audit – This report gives the Tracking Details of the transaction and the value. It also includes Sub-Lines showing where the transaction was allocated.
- Discount Due – This report gives the details of Discounts due to the Client on each transaction. This includes the number of days the discount is limited to, the percentage amount and the actual amount in dollars.
- One Line FX – This report gives the Tracking Details of Foreign Currency transactions and its value.
- Audit FX – This report is as above for the One Line FX report but also includes the Sub-Lines showing where the Foreign Currency transaction was allocated.
- One Line Transaction – Gives the Tracking Details of the transaction and the value.
- Wide Transaction Audit – Landscape version of the Transaction Audit report above.
- Credit Memo – This option allows you to create a credit memo when required.
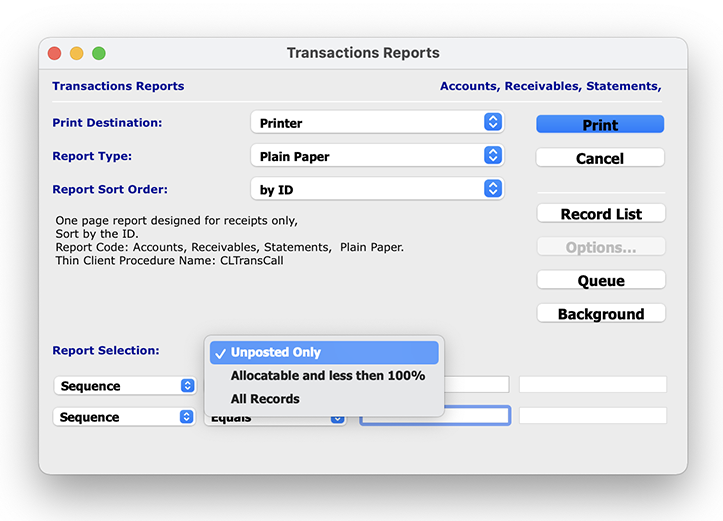
The ‘Report Selection’ drop-down menu also allows you to select which Client transaction data you would like to report on, allowing you to get more granular and specific with your reporting capabilities.
- Unposted Only – This option creates a report for all transactions that are not posted and have not been transferred to the GL.
- Allocatable and less than 100% – This option creates a report for transactions that have not yet been allocated at 100%.
- All Records – This option prints a report for all Clients irrespective of balances owing. This also includes all Clients with a balance of $0.00.
Once you have chosen your defined report details, and selected ‘Print’, you have the option to open the report as a PDF or print the report directly from SapphireOne.
Any questions?
Stay tuned for the next blog post in our next Accounts Receivables Report Tutorials, where we will be diving into the Statements Report.
For more information on Accounts Receivables Reports, or to learn how how you can get the most out of your SapphireOne application, please contact us or book a call with a member of our Support Team. We love hearing from you!
SapphireOne Accounts Receivables Report Tutorial: The Balances Report
December 18, 2020 9:00 am | by John Adams

Creating an Accounts Receivables Balances Report in SapphireOne.
SapphireOne has a variety of Accounts Receivables reports available, each allowing you to report dynamically on client data for many different purposes. The aim of the Account Receivables Report tutorials is to take you through each of the six reports so you can stay informed and up-to-date on SapphireOne reporting functionalities.
SapphireOne has six different types of Accounts Receivables reporting options, these include:
- Details
- Balances
- Transactions
- Statements
- Show Reports
- Dashboards
In our previous post we looked at when and how to create the Client Details Report. In this post we will be looking in more detail at the second Accounts Receivables reporting option, the Balances Report.
The Balances Report.
The Client Balances Report gives you the ability to create and print a Credit Information report on Clients who currently have outstanding balances, giving you an overview of exactly which Clients owe money.
When selecting the Balances Report, you are presented with a print dialog pop-up enabling the selection of items required in the report:
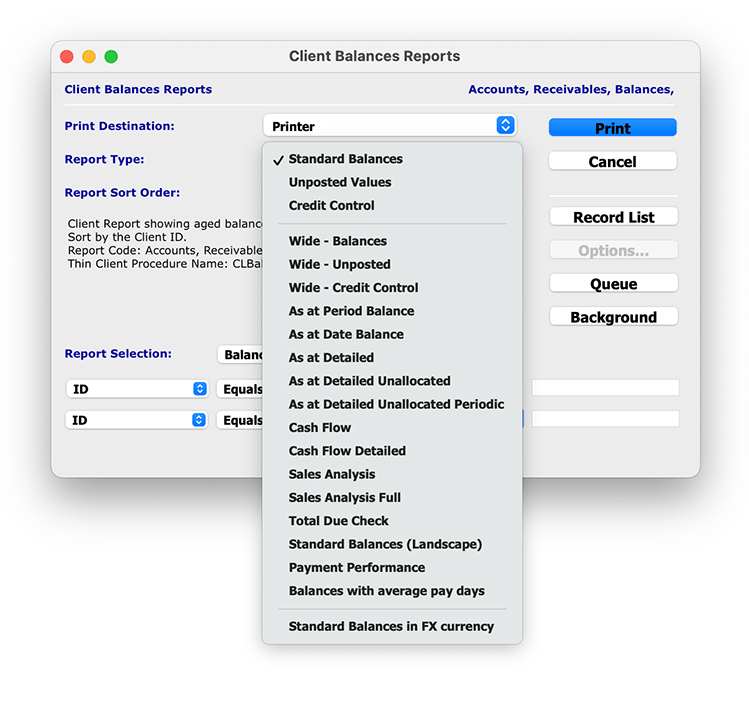
This reporting function gives you the ability to choose from 20 different report types to best suit your specific reporting requirements. Below is an overview of each Report Type, and what each type can be used for:
- Standard Balances – This report shows the Standard Aged Balances.
- Un-posted Values – This report includes the un-posted values in the Standard Aged Balances Report.
- Credit Control – This report adds information about last receipt date and amount, contact, position and phone details.
- Wide – Balances – This report allows for the print of the reports in a wide format increasing the amount of Balance Data displayed.
- Wide – Un-posted – Allows the printing of the reports in wide format increasing the amount of Balance Data displayed, including un-posted.
- Wide – Credit Control – Allows the printing of the reports in wide format increasing the amount of Balance Data displayed, including Last Receipt details.
- As at Period Balance – This report gives the Client Balances as at a particular period in time. This should agree with the Balance Sheet Control Account for the same period.
- As at Date Balance – This report gives a balance report based upon current transactions.
- As at Detailed – This report gives a balance report based upon 7, 14, 21, 30, 60 and 90 days. This report also provides the Client’s agreed terms.
- As at Detailed Unallocated – This report prints balances for each client that are overdue and are also unallocated as of the entered date.
- As at Detailed Unallocated Periodically – This report prints balances for each client that are overdue and are also unallocated for a chosen period.
- Cash Flow – This report allows you to specify a given date prior to viewing balances to aid in cash flow projections.
- Cash Flow Detailed – This report allows you to specify a given date prior to viewing balances and transactions to aid in cash flow projections.
- Sales Analysis – This report gives a brief Sales Analysis of each Client.
- Sales Analysis Full – Gives full details of the Sales Analysis.
- Total Due Check – Simple Report that only prints: Total Due, Historial Total and Current Total.
- Standard Balances (Landscape) – This is the same as the Standard balances report, but in landscape format with extra room for Company name.
- Payment Performance – This prints a report in the form of a chart for the selected Clients displaying their payment performance as a percentage for payment term periods.
- Balances with Average Pay Days – This report prints out for the selected, Clients the average time in days it takes a Client to make payment.
- Standard Balances in FX Currency – Prints the balances in both the Local and FX currencies.
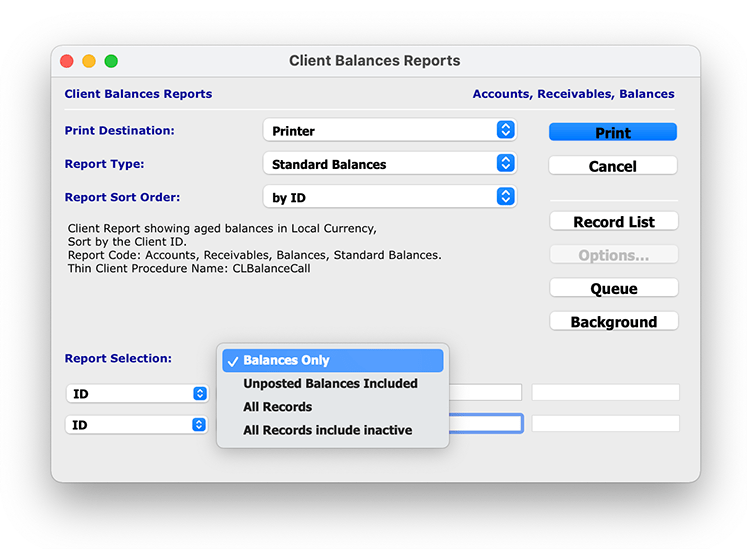
The ‘Report Selection’ drop-down menu also allows you to select which Clients balance data you would like to report on, allowing you to get more granular and specific with your reporting capabilities:
- Balances Only – This will print out all of the active Client balances. It will be limited to those Clients who do not have a zero balance.
- Unposted Balances Included – Will print out a report which includes all active Clients balances which will now include any unposted transactions and again those Clients who do not have a zero balance.
- All Records – This option will tell the system to print balances for all active Clients currently in the system including those with a zero balance.
- All Records Include Inactive – The system will print the balances for all Clients in the system including those who are currently marked as inactive. This will not reset their inactive state to active and it will also list those who have a zero balance which should mostly be the inactive clients.
Once you have chosen your defined report details, and selected ‘Print’, you have the option to open the report as a PDF or print the report directly from SapphireOne.
Any questions?
Stay tuned for the next blog post in our next Accounts Receivables Reporting Tutorials, where we will be focusing on the Transactions Report.
For more information on Accounts Receivables Reports, or to find out how you can get the most out of your SapphireOne application, please contact us or book a call with a member of our Support Team. We love hearing from you!
SapphireOne Accounts Receivables Report Tutorial: The Client Details Report
December 11, 2020 12:00 pm | by John Adams

Creating an Accounts Receivables Client Details Report in SapphireOne
SapphireOnes Accounts Receivables Report functionality allows you to produce a variety of reports based on templates that have been designed in SapphireOne.
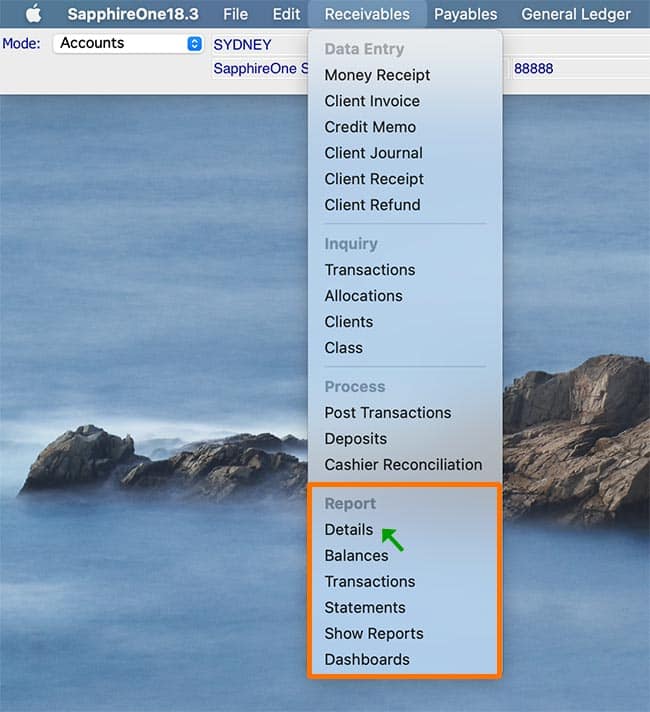
The Accounts Receivables reporting functionality includes six different types of reporting options, these are:
- Details
- Balances
- Transactions
- Statements
- Show Reports
- Dashboards
Each Accounts Receivables report allows you to report dynamically on multiple client data fields for a variety of purposes.
The aim of the Accounts Receivables Reporting Tutorials is to take you through each of the six reports, so you can learn how to create and when to use each report, and stay up-to-date on all SapphireOne’s reporting capabilities.
The Client Details Report
The first of the Accounts Receivables reporting options in SapphireOne is the Client Details Report.
The Client Details Report gives you the ability to report on your clients contact details using a variety of defined data fields. You have the option to choose from 9 reporting types, each allowing you to generate reports on different client contact information.
When selecting the Client Details Report, you are presented with a print dialog pop-up enabling the selection of items required in the report. You have the option to select which Detail you would like to report on from a variety of reporting types.
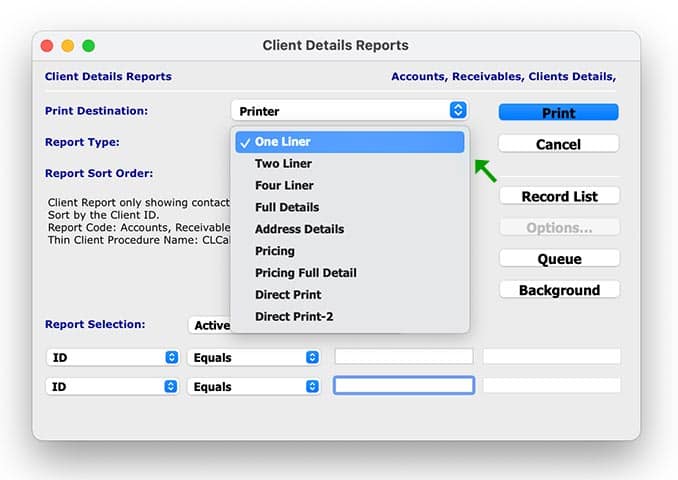
Below is an overview of each Client Details Report Type, and what each report can be used for:
- One Liner – This is a simple report showing ID, Name, Contact, Position and Phone details.
- Two Liner – This report expands on the above report with additional Contact details for the nominated Client.
- Four Liner – This report expands again on the Two Liner and gives Postal and Physical Address details.
- Full Details – This report gives ALL details about each Client. There are two to a page unless there are too many notes or keywords for a Client.
- Address Details – This report gives details of the Multiple Addresses set up for each of the clients.
- Pricing – This report includes Price Book Information.
- Pricing Full Details – This report includes Price Book information and Client information.
- Direct Print – This report allows for the use of Direct Print layout as set up in Utilities. Within SapphireOne you can navigate to Utilities/Controls/Direct Print Layouts to define this.
- Direct Print 2 – This report allows for the use of another Direct Print layout option as set up in Utilities. Within SapphireOne you can navigate to Utilities/Controls/Direct Print Layouts to define this.
In the Report Selection menu drop-down, you can select the All Records option to print details for all Clients instead of only the Active Only Clients.
Once you have chosen your defined report details, and selected Print, you have the option to open the report as a PDF or print the report directly from SapphireOne.
Any questions?
Stay tuned for the next blog post in our next Accounts Receivables Reporting Tutorials, where we dig into the Balances Report.
For more information on Accounts Receivables Reports, or to find out how you can get more out of your SapphireOne application, please contact us or book a call with a member of our Support Team. We love hearing from you!
Tutorial Series: Client Inquiry in Accounts Receivables
August 12, 2020 10:56 am | by John Adams

The initial Client Inquiry Window in Accounts Receivables contains an overview of all Clients, including some of their basic details.
Note that these are the default settings, meaning any changes you make via the Client Inquiry become permanent for the Client’s record. There are other areas of the software in which you can alter Client details which will not become permanent.
Once you enter a specific Client, the first page of the Client Inquiry Window will open which is called “Details” and it is divided into four different areas:
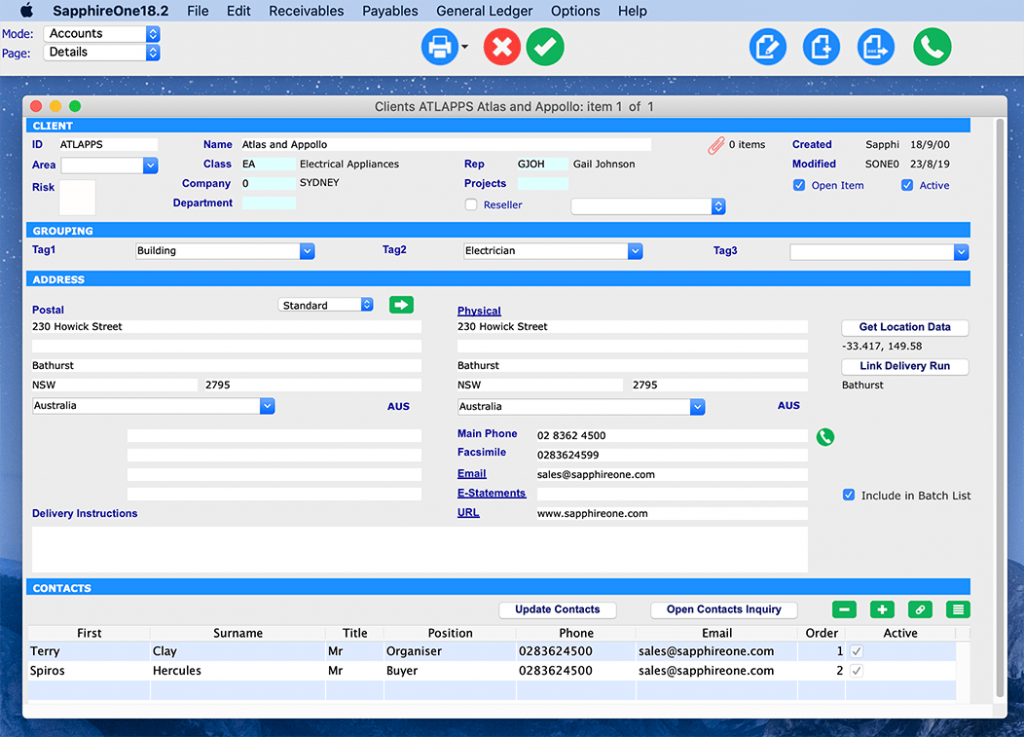
1) Client Details
2) Client Grouping
3) Client Address
This area contains three different sub-sections that can be selected via the drop-down menu. They are called: Standard, Statement and Invoice.
4) Client Contacts
Once you enter a specific Client, there is a total of 22 pages that you can choose from and they all contain different information and data relating to that Client. By default, the first page which is called “Details” will be opened.
How to delete Clients:
SapphireOne retains strict audit control and therefore does not allow the deletion of Clients. However, a Client can be made Inactive and vice versa at any time, provided that there are no balances for that client.
Inactive Clients will not show in the Client Inquiry window. If you want to see inactive Clients in the list view as well, you can either:
- Do a query for “All Records”, or
- Select “Include Inactive” from the Tools button, or
- Select “Toggle Active” from the Tools button = This tool reverses the active status on all selected records. This means that any active clients will be made inactive and all inactive clients will be made active.
SapphireOne is a highly functional and user-friendly accounting software. For more information on the Client Inquiry in Accounts Receivables and all of its other capabilities, sign up for a live demo with us.