
SapphireOne’s Drag and Drop feature eliminates manual data entry and creates complex sales orders within minutes.
March 24, 2021 4:00 pm | by John Adams

Use SapphireOne’s Drag and Drop feature to simplify data entry processes and import data instantaneously.
SapphireOne’s Drag and Drop feature is a game changer when it comes to streamlining data entry processes and an incredibly useful tool for reducing errors and time spent manually entering complex data.
The Drag and Drop feature is available to use across all SapphireOne Inventory Sales & Inventory Purchases Data Entry screens and gives you the ability to complete data entry in a matter of minutes.
Read on to learn exactly how to use this feature and the benefits it will bring to your business.
Easily import an unlimited number of line items and SKUs straight to your data entry screen.
At SapphireOne many of our clients are processing large sales orders consisting of over 100,000 inventory items, 800 line items and large order quantities, which can make data entry incredibly time consuming and confusing for employees.
Using the Drag and Drop feature, SapphireOne users can now eliminate manual data entry and make use of the feature to import and populate an unlimited number of line items and SKUs directly from their excel file into the SapphireOne system.
To use the Drag and Drop feature, simply follow the below four steps:
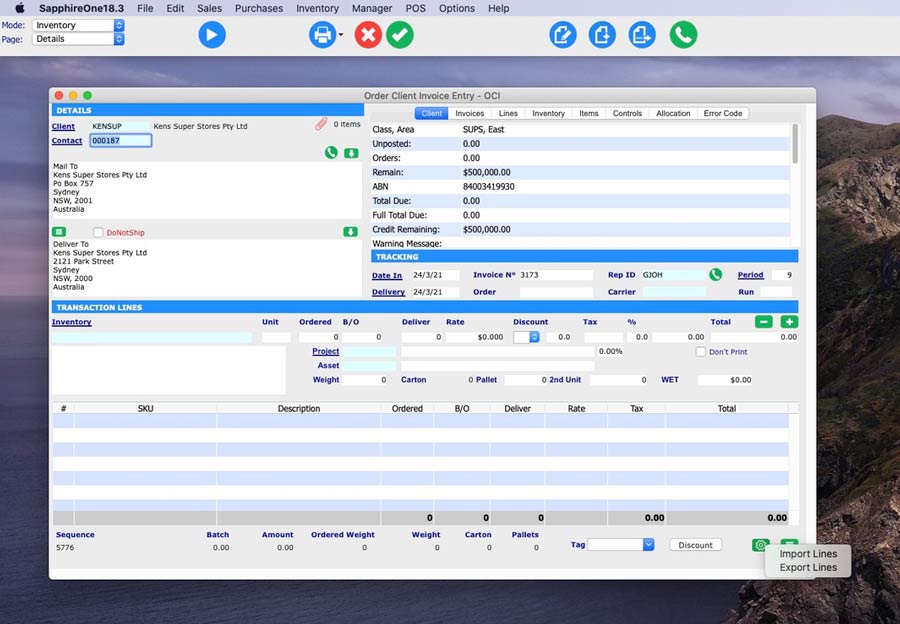
Step 1. Upon opening your selected data entry screen within SapphireOne, navigate your way to the bottom right hand corner of the screen where you will see two green icons.
Step 2. Select the left ‘toggle’ icon, and then select ‘Import Lines’ to choose the populated excel document you would like to import, or simply drag the excel document into the bottom Transaction Lines area of the data entry screen.
It is important to note that all excel docs must be saved as a csv file before importing.
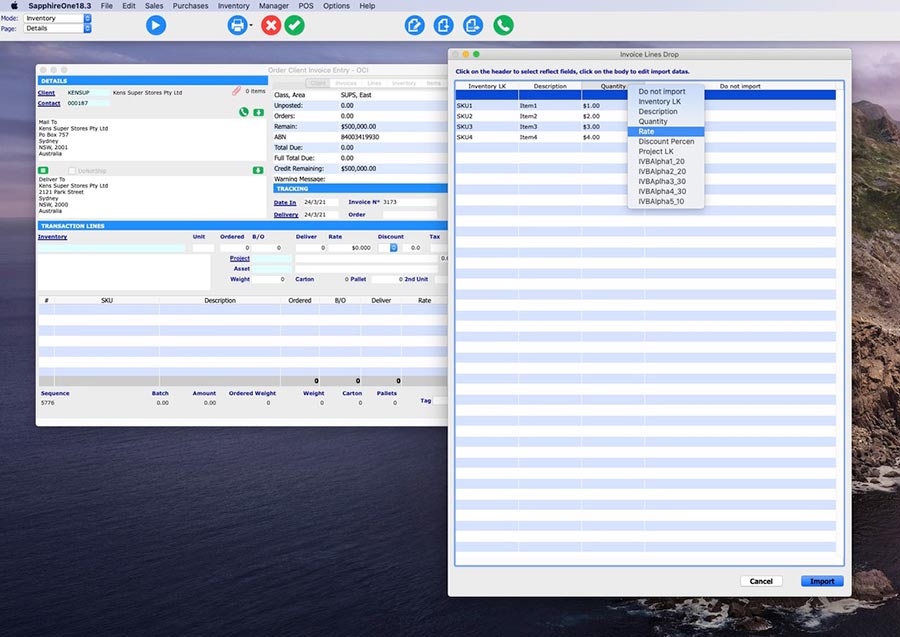
Edit and organise your data before importing.
Step 3. Once you have selected your chosen excel document, you will be automatically shown the above pop-up screen which gives you the ability to easily edit and organise your data. Right click on the top heading columns to select the corresponding heading name that relates to your data.
As an example, this feature is perfect for creating Client Sales Orders and Purchase Vendor Invoices as it gives you the option to send an excel template to your all customers and vendors for them to populate with their orders. This excel document then be imported directly to your Client Sales Order or Purchase Vendor Invoice data entry screen within SapphireOne for instant processing.
All headings within every SapphireOne data entry screen are also fully customisable, and you can select from a range of heading options to meet your specific business requirements. In the above image we have selected Inventory SKU, Description, Rate and Quantity as an example.
Step 4. Once you have chosen your headings, select ‘Import’.
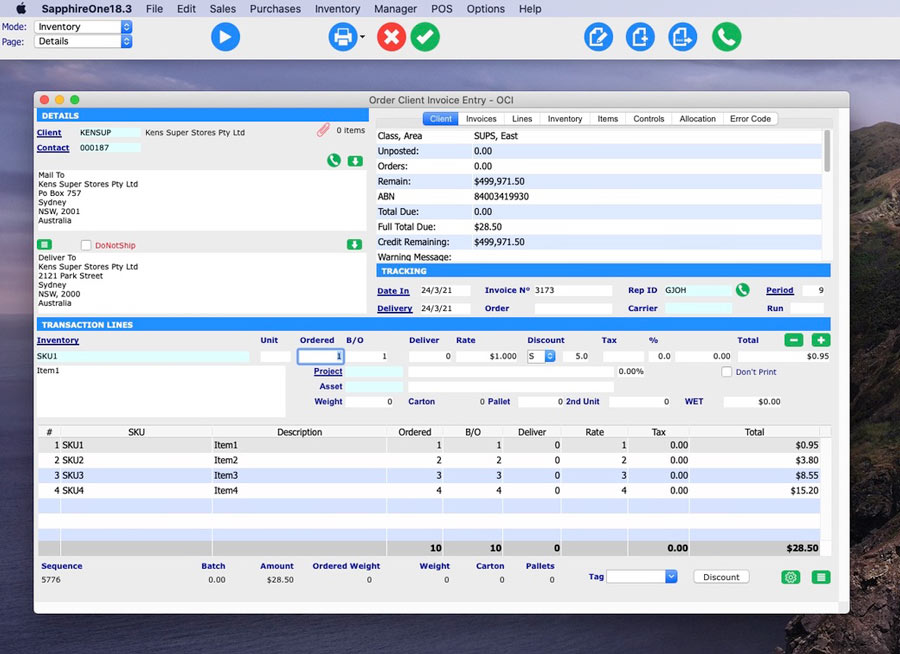
Simple, efficient and customisable data entry.
As you can see in the above screenshot, the Transaction Lines area of the screen have now been instantaneously populated with the data from the excel document.
This feature also works in reverse giving you the ability to export all data from any SapphireOne data entry screen to excel.
Whether you are importing a small amount of data or an order of 100,000 inventory items, SapphireOne’s Drag & Drop feature will function in the same simple and time efficient way and dramatically streamline data entry processes for your business.
For more information on our Drag and Drop feature, or any of our API Integrations and Partnerships designed to make your life easier, you can contact us or book a call with a member of our Support Team. We’re always here to help!
SapphireOne’s Jack Adams selected for 2021 FIS Alpine World Ski Championships.
January 18, 2021 11:00 am | by John Adams

Jack Adams to compete for New Zealand team at the FIS Alpine World Ski Championships in Italy, February 2021.
We are proud to announce that SapphireOne sponsored alpine athlete Jack Adams has been selected to compete as part of the New Zealand team at the 2021 FIS Alpine World Ski Championships in Cortina d’Ampezzo, Italy between the 7th and 21st of February, 2021.
Jack has been selected to be part of the Kiwi team of four, alongside fellow teammates Alice Robinson, Piera Hudson and Will Feasey.
Jack is currently based in Pitzal, Austria where he has spent the past two months training and competing, and has recently achieved his career best result at a FIS Slalom race in Hochfuegen, Austria.
The FIS Alpine World Ski Championships are held once every two years. In a recent article by Snow Sports NZ, NZ Head of Alpine Jono Howson explains “World Champs is a stand alone-event and the person that is crowned world champion gets to claim that for two years, it is quite an honour.”
We wish Jack Adams and the team every success and look forward to following their results at this prestigious event.
SapphireOne Accounts Receivables Report Tutorial: The Statements Report
January 4, 2021 8:35 am | by John Adams

Creating an Accounts Receivables Statements Report in SapphireOne.
For the next post in our Accounts Receivables Report Tutorials, we will be focusing on the fourth Accounts Receivables reporting option in SapphireOne, the Statements Report.
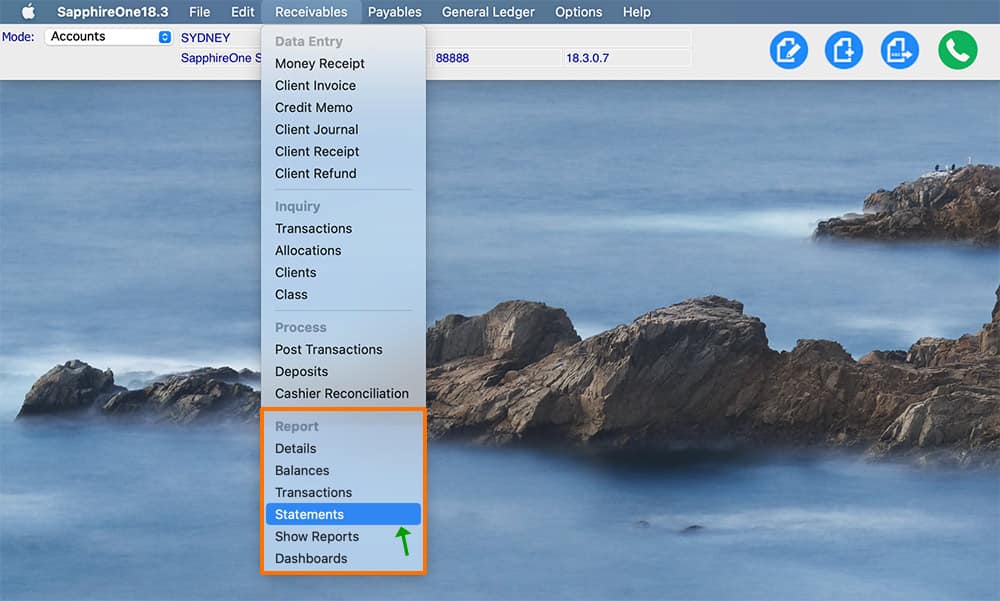
There are six different types of Accounts Receivables reporting options available within SapphireOne. This includes:
- Details
- Balances
- Transactions
- Statements
- Show Reports
- Dashboards
In our previous three posts we looked at the Client Details Report, the Balances Report and the Transactions Report. Read on to learn more about when and how to create the Statements Report, and make sure you are getting the most out of all SapphireOne reporting functionalities.
The Statements Report.
The Accounts Receivables Statements Report gives you the ability to produce different Statement layouts. This report is helpful for debt collection as it gives you the ability to produce a report to give to Clients to show they currently have outstanding.
The Statement Report presents a print dialog pop-up for the selection of the items required to be printed in the report.
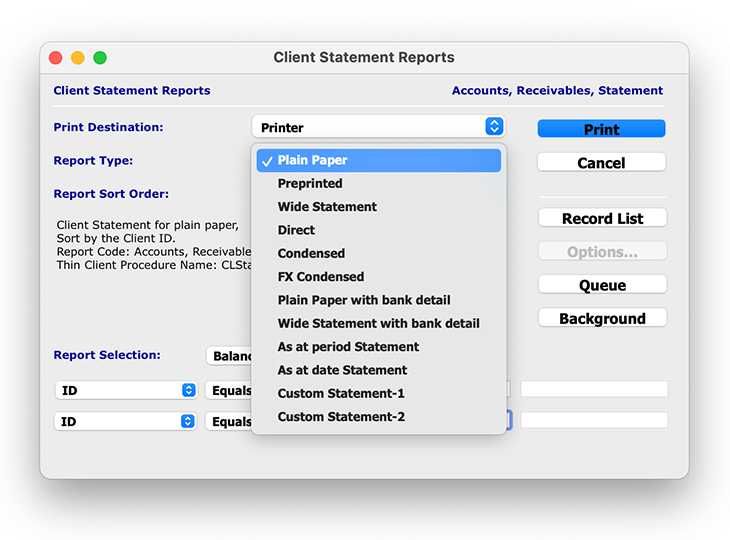
When ‘Printer’ is selected from the Print Destination drop-down menu, the ‘Report Type‘ menu gives you the ability to report on 12 different Statement Report types. This includes:
- Plain Paper – This report will print a statement onto blank paper whether using Laser or Image-Writer printers. All lines, graphics etc will be printed.
- Pre-Printed – This is for printing statements onto pre-designed forms. The lines and graphics will already be on the forms.
- Wide Statement – This report will print a landscape statement onto blank paper (Laser or Image-Writer).
- Direct – This is for printing to serial printers. The layout is set up from the Direct Print control in ‘Utilities’. Navigate to: Utilities/Controls/Direct Print Layouts
- Condensed – This report produces a compressed report for filing purposes with the same data as a statement.
- FX Condensed – This report produces a client statement report in foreign currency, and is compressed for filing purposes.
- Plain Paper with Bank Detail – This produces a statement report on plain paper with the clients bank details in portrait.
- Wide Statement with Bank Detail – This is a two section landscape report with a detailed statement on the left and a remittance on the right. The second section is a simple statement/remittance, and provides an area where the amount being paid may be entered and the entire page returned.
- As at Period Statement – This function enables the user to print statements based on an ending period. A pop up will ask for the entry of a period.
- As at Date Statement – This function enables the user to print statements based on a date as entered. A pop up will ask for the entry of a date.
- Custom Statement-1 – This is a Custom Report statement that has been set up in ‘Utilities’. Navigate to: Utilities/Controls/Custom Report Layouts.
- Custom Statement-2 – This is a Custom Report statement that has been set up in ‘Utilities’. Navigate to: Utilities/Controls/Custom Report Layouts.
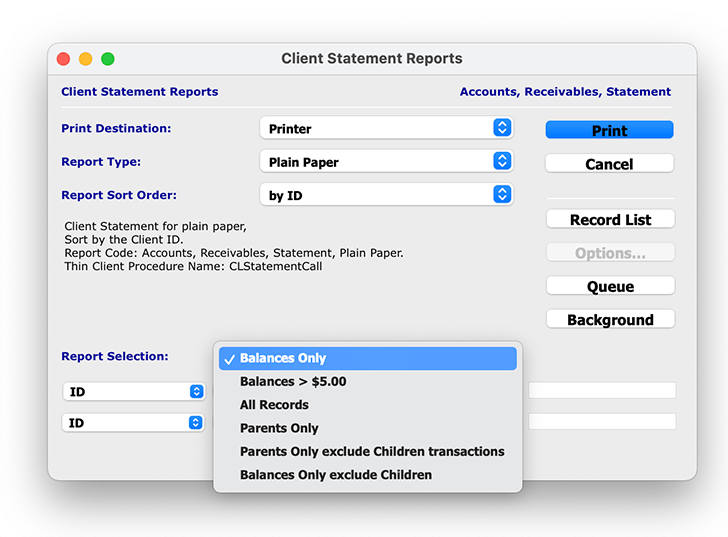
The ‘Report Selection’ drop-down menu gives you the ability to select which clients statement data you would like to report on, allowing you to get more granular and specific with your reporting capabilities.
- Balances Only – This is the default selection and the system will only print out Client balances for those who do not have a balance of $0.00.
- Balances > $5.00 – This report is the same as the default report, however it will only include Clients who have a balance owing of $5.00 or more.
- All Records – This option prints a report for all Clients irrespective of balances owing. In some instances this will be a very large report as Clients with a balance of $0.00 will be included.
- Parents Only – This option will only print those Clients who are recognised by the system as parents and have a balance owing.
- Parents Only exclude Children Transactions – This option will only print those Clients who are recognised by the system as parents and have a balance owing. Any child transactions will be excluded.
- Balances Only exclude Children – This option will print balances for all Clients, except those who the system recognises as Children of Parents.
Once you have chosen your defined report details, and selected ‘Print’, you have the option to open the report as a PDF or print the report directly from SapphireOne.
Any questions?
For the next final post in our next Accounts Receivables Reporting Tutorials we will be focusing on the remaining two ‘Show Reports’ and ‘Dashboards’ reporting functionalities within SapphireOne.
For more information on Accounts Receivables Reports, or to find out how you can get the most out of your SapphireOne application, please contact us or book a call with a member of our Support Team. We are always here to help!
SapphireOne Accounts Receivables Report Tutorial: The Transactions Report
December 21, 2020 9:51 am | by John Adams

Creating an Accounts Receivables Transactions Report in SapphireOne.
SapphireOne has six different Accounts Receivables reports options, each allowing you to report dynamically on client data for many different purposes.
- Details
- Balances
- Transactions
- Statements
- Show Reports
- Dashboards
In our previous tutorials we looked at how to create the first two Client Details Report and Balances Report in more detail. This post focuses on the third Accounts Receivables report option within SapphireOne, the Transactions Report.
Continue reading to learn more about when and how to use the Accounts Receivables Transactions Report, and stay up-do-date on all reporting functionalities available with SapphireOne.
The Transactions Report.

The Client Transactions Report gives you the ability to generate a list of all outstanding transactions via a variety of different criteria and fields contained within your SapphireOne Client data profiles.
When selecting the Transactions Report, you are presented with the following print dialog pop-up enabling the selection of items required in the report:
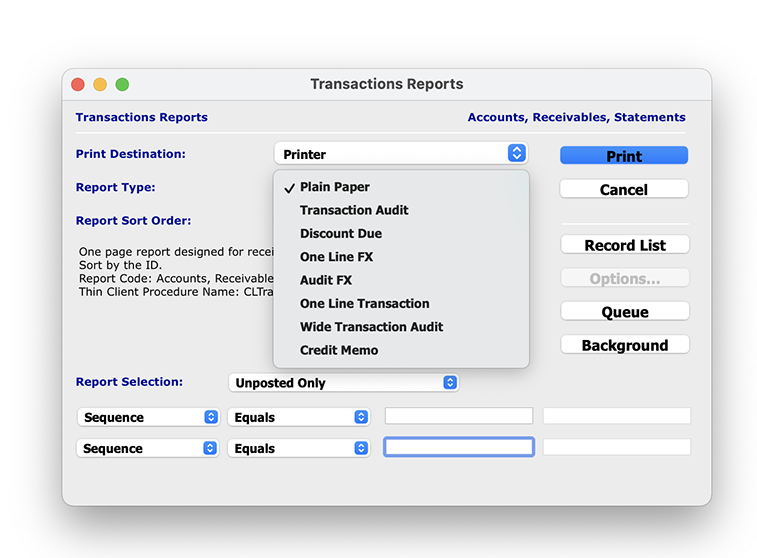
When ‘Printer’ is selected from the Print Destination drop-down menu, the ‘Report Type’ menu gives you the ability to create 8 different Transaction Report Types depending on your specific reporting requirements. This includes:
- Plain Paper – This report is a one page report designed for receipts only.
- Transaction Audit – This report gives the Tracking Details of the transaction and the value. It also includes Sub-Lines showing where the transaction was allocated.
- Discount Due – This report gives the details of Discounts due to the Client on each transaction. This includes the number of days the discount is limited to, the percentage amount and the actual amount in dollars.
- One Line FX – This report gives the Tracking Details of Foreign Currency transactions and its value.
- Audit FX – This report is as above for the One Line FX report but also includes the Sub-Lines showing where the Foreign Currency transaction was allocated.
- One Line Transaction – Gives the Tracking Details of the transaction and the value.
- Wide Transaction Audit – Landscape version of the Transaction Audit report above.
- Credit Memo – This option allows you to create a credit memo when required.
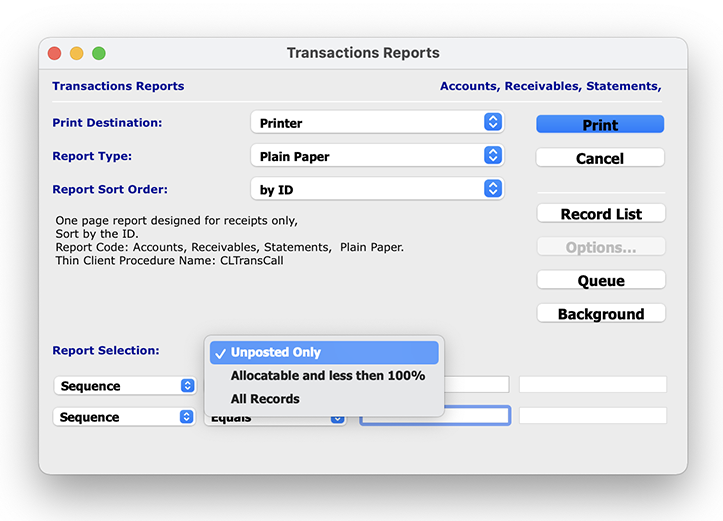
The ‘Report Selection’ drop-down menu also allows you to select which Client transaction data you would like to report on, allowing you to get more granular and specific with your reporting capabilities.
- Unposted Only – This option creates a report for all transactions that are not posted and have not been transferred to the GL.
- Allocatable and less than 100% – This option creates a report for transactions that have not yet been allocated at 100%.
- All Records – This option prints a report for all Clients irrespective of balances owing. This also includes all Clients with a balance of $0.00.
Once you have chosen your defined report details, and selected ‘Print’, you have the option to open the report as a PDF or print the report directly from SapphireOne.
Any questions?
Stay tuned for the next blog post in our next Accounts Receivables Report Tutorials, where we will be diving into the Statements Report.
For more information on Accounts Receivables Reports, or to learn how how you can get the most out of your SapphireOne application, please contact us or book a call with a member of our Support Team. We love hearing from you!
Explained: Why we run SapphireOne on a Dedicated Application Server.
December 4, 2020 11:00 am | by John Adams

We are often asked the reason we choose to run SapphireOne on a Dedicated Application Server, so we want to take the time to share why.
In today’s tech-savvy world, businesses both large and small are faced with a wide range of hosting options, and deciding if a dedicated application server or cloud environment will best support your business is a critical decision for any enterprise.
Ultimately, the decision is not always black and white, and comes down to how each server addresses a businesses individual needs. The industry, size, budget and businesses goals are just a few factors to take into consideration when making such a decision.
For Medium-Large sized businesses with large data sets, a large number of employees, who want things to be quick, efficient and scalable with the best possible performance, then a dedicated server is the best possible solution.
Dedicated Application Server vs Virtual Cloud Server.
What is a Dedicated Application Server?
A dedicated application server is a physical server that is purchased entirely for your own businesses needs. They are typically used by large businesses and organisations that require high levels of data security and a steady, high demand for server capacity.
What is a Cloud Server?
A cloud server is a virtual server running in a cloud computing environment. Instead of being hosted on a physical hardware that’s solely used by you, they reside in a shared ‘virtualised’ environment that’s managed by your cloud hosting provider and shared with other businesses.

Benefits of a Dedicated Application Server.
1. Optimal server performance.
Firstly, and most importantly, a dedicated application server ensures that the performance of the hardware is totally maximised, and that you are receiving the very most out of what your software has to offer.
As all the servers resources are dedicated solely towards powering the application, it guarantees maximum uptime for your business, giving you the best of the server and powering your application to ensure optimal performance at all times.
2. Server resources are not shared.
For Medium-Large sized enterprises, a dedicated server provides more stability and reliability than a shared environment as all the resources are allocated solely to your individual business.
Virtual servers have less space because you are sharing environments, leaving you vulnerable to other businesses using up the servers CPU and Ram space, and spikes in bandwidth usage causing your server to slow down.
With a dedicated application server you will have peace of mind knowing that you’ll be receiving the full resources of the single server, and that your server will always have enough space to support your business.
3. Total control of your server.
A dedicated application server gives you complete control over your server, and the ability to customise the server environment to fit your specific business needs.
This means you are not limited by a virtual environments server requirements, and your system administrators can configure the dedicated server for the exact level of space that is required to support operations.
4. Increased server security and data integrity.
A dedicated physical server means that you always know where your server is, and can always be certain of its safety and security.
A dedicated server also means you have total control over who has access to your data, and the means that are being taken to protect it. You can also 100% sure that you are not sharing your server with any malicious websites or potential scammers, and that your data never falls into the wrong hands.
Let’s think of it this way…

You have a nuclear powered submarine that has the ability to stay underwater for months on end. By deciding to convert it to diesel power, the submarine now has to spend time coming up to the surface every week in order to repower, using up precious time and resources, and leaving it open to external threats.
By choosing to power the engine with diesel, the capabilities and performance of the submarine are not being maximised, and it is not being used to its full potential.
It is similar thinking when looking at a Medium-Large enterprise running the SapphireOne application on a virtual server. The SapphireOne application has the ability to process billions of records, however a virtual server is not designed to power and support such a system. This allows for flaws in the running of the system and leaves the application open to vulnerabilities and external threats.
When running your application on a dedicated server, you have total control over your physical server, and can be confident that your software is being maximised and supported to perform to the very best of its ability.
In conclusion.
At the end of the day, we care most about the server that will provide our customers with an efficient and scalable solution, power their SapphireOne application, and ensure that they are always receiving the best possible performance for their business.
Blog post written by John Adams and Maddie Kent.
SapphireOne at a glance, from 1986 to now.
November 26, 2020 8:59 am | by John Adams
Let us take you on a walk down memory lane…
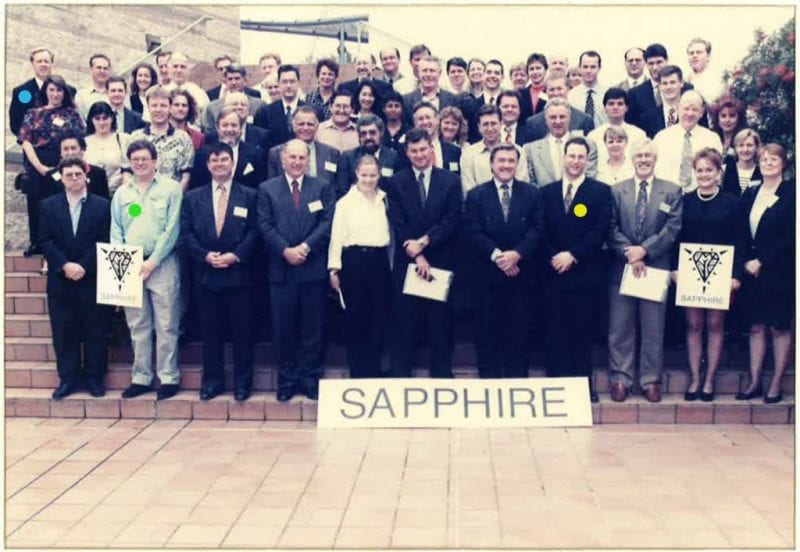
Recently, our long standing customer and good friend James Brown, of Bordo International, came across hundreds of SapphireOne new version floppy disks and CDs in his archives dated back to when he first became our client in 1995.
He very kindly mailed us a sample of all these disks, which sent us all on a little walk down memory lane.

1986, where it all began.
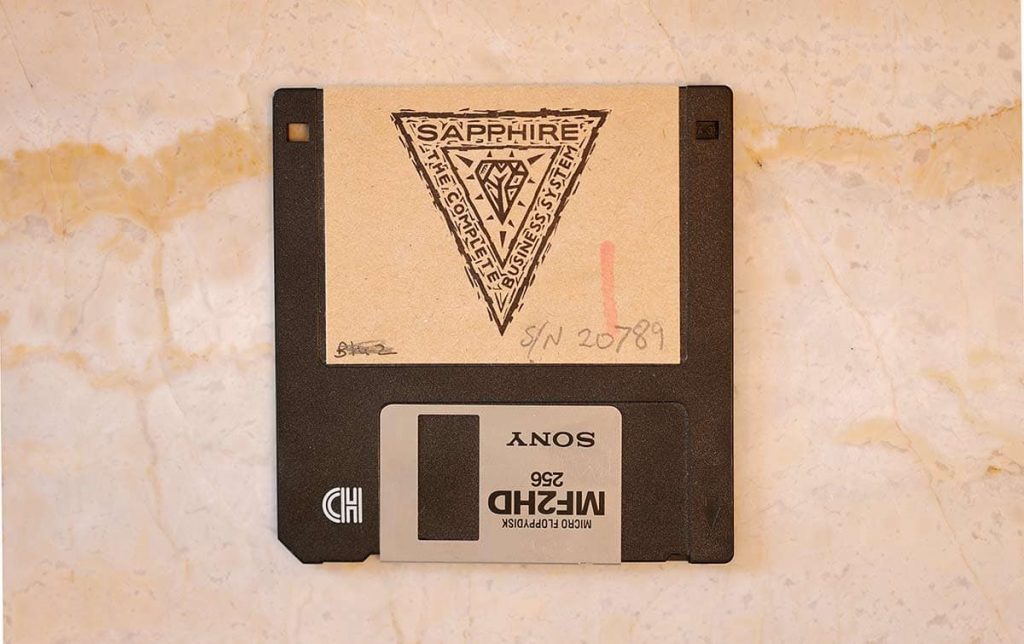
Back in 1986, SapphireOne – then called ‘Sapphire’ – released our very first version. During this time our Financials, PayRoll and Asset modules were all separate applications.
It would take us over 12 hours to do one compile for a new version, which we would then mail out on 30 individual floppy disks to our clients so they could download the update on their computers.
Because of this manual and lengthy process for both us and our clients, we would only release a handful of SapphireOne version updates each year.
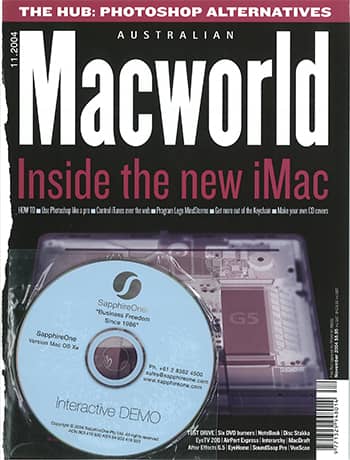
As Sapphire moved through the years, and technology advanced us into the CD-ROM era, we then began to mail our new releases to our clients on a single CD disk.
This improved performance dramatically – the compile times came down, and clients were able to download their new Sapphire updates a lot faster.
Through the 2000s.
In 2001, Sapphire changed its name to SapphireOne – when Financial, PayRoll and Assets were all merged into the one application.
It was in 2003 that we came up with our now identifiable and symbolic SapphireOne aqua logo. Many people ask if our logo is a Yin & Yang symbol, however that is not the case – it is in fact the merge of the ‘S’ and the ‘O’, and is symbolic of the beginning of new life as one cell splits into two.
All the way to 2020.
Fast forward to 2020, where SapphireOne has now expanded globally into 8 modules, all merged into one all-encompassing software solution – including Accounts, Inventory, Job Projects, Asset Management, PayRoll/HR, Management, Utilities and Document Management.
These days it takes us a matter of 5 minutes to do a compile, and we release new versions and software updates every week for our clients to download instantaneously through our FTP server.
It’s amazing to reflect on just how far technology has come since the good old floppy disk days.
Watch SapphireOne over the years.
John Adams, CEO of SapphireOne, has created a time-lapse as a representation of the thousands of compiles we have done since launching our first Sapphire version back in 1986.
You can view the video on our About Us page, the first video on our timeline, and also have a deeper look back to learn more about where SapphireOne has come from and how we have developed into the all-encompassing software solution we are today.
We want to thank James Brown for sending these disks to us, it has been incredible to take a moment to reminisce on how SapphireOne has advanced and grown over all these years – we can’t wait to see what the next 30 bring!
Blog written by Madeleine Kent. Video by John Adams and Archana Sawant.